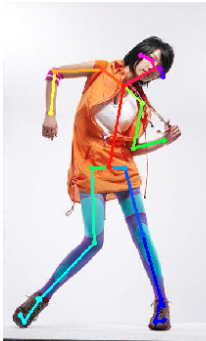
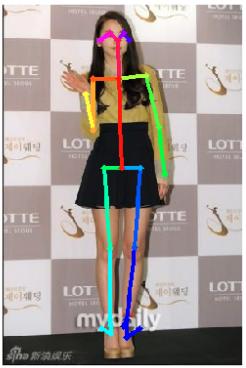
OpenPose 的 Python 模块提供了 Python API,可以用于构建 OpenPose 类(class),其输入是 numpy array 格式的图像,并得到 numpy array 格式的 Pose 位置估计.
该 Python API 还提供了直接从网络(network)得到的 heatmaps 作为输入,并提取出 pose 关键点(需要安装 Caffe Python接口).
现阶段,Python API 仅支持 Body 姿态估计,Hands 和 Face 将来会支持.
1. Python API 模块及安装
OpenPose Python 模块兼容 Python2 和 Python3. 需要 python-dev, Numpy 和 OpenCV(图片加载)
# Python 3 (default and recommended)
sudo apt-get install python3-dev
sudo pip3 install numpy opencv-python

# Python 2
sudo apt-get install python-dev
sudo pip install numpy opencv-python
OpenPose的 Python API,需要在 CMake GUI 中设置 BUILD_PYTHON.
OpenPose 模块 - openpose.py:
在 build中运行 make install 安装命令,则 OpenPose 库安装路径为 /usr/local/python.
"""
OpenPose 库 Python 接口
"""
import numpy as np
import ctypes as ct
import cv2
import os
from sys import platform
dir_path = os.path.dirname(os.path.realpath(__file__))
# dir_path = 'OPENPOSE_ROOT/build/python/openpose/'

class OpenPose(object):
    """
    Ctypes linkage
    """
    if platform == "linux" or platform == "linux2":
        _libop= np.ctypeslib.load_library(
            '_openpose', dir_path+'/_openpose.so')
    elif platform == "darwin":
        _libop= np.ctypeslib.load_library(
            '_openpose', dir_path+'/_openpose.dylib')
    elif platform == "win32":
        try:
            _libop= np.ctypeslib.load_library(
                '_openpose', dir_path+'/Release/_openpose.dll')
        except OSError as e:
            _libop= np.ctypeslib.load_library(
                '_openpose', dir_path+'/Debug/_openpose.dll')
    _libop.newOP.argtypes = [ct.c_int, ct.c_char_p, ct.c_char_p,
                             ct.c_char_p, ct.c_float, ct.c_float,
                             ct.c_int, ct.c_float, ct.c_int,
                             ct.c_bool, ct.c_char_p]
    _libop.newOP.restype = ct.c_void_p
    _libop.delOP.argtypes = [ct.c_void_p]
    _libop.delOP.restype = None

    _libop.forward.argtypes = [
        ct.c_void_p,
        np.ctypeslib.ndpointer(dtype=np.uint8),
        ct.c_size_t,
        ct.c_size_t,
        np.ctypeslib.ndpointer(dtype=np.int32),
        np.ctypeslib.ndpointer(dtype=np.uint8),
        ct.c_bool]
    _libop.forward.restype = None

    _libop.getOutputs.argtypes = [
        ct.c_void_p,
        np.ctypeslib.ndpointer(dtype=np.float32)]
    _libop.getOutputs.restype = None

    _libop.poseFromHeatmap.argtypes = [
        ct.c_void_p,
        np.ctypeslib.ndpointer(dtype=np.uint8),
        ct.c_size_t,
        ct.c_size_t,
        np.ctypeslib.ndpointer(dtype=np.uint8),
        np.ctypeslib.ndpointer(dtype=np.float32),
        np.ctypeslib.ndpointer(dtype=np.int32),
        np.ctypeslib.ndpointer(dtype=np.float32)]
    _libop.poseFromHeatmap.restype = None

    def encode(self, string):
        return ct.c_char_p(string.encode('utf-8'))

    def __init__(self, params):
        """
        OpenPose Constructor: 初始化 OpenPose 对象

        参数:
        ----------
        params : 需要的参数,dict 格式.

        返回值:
        -------
        outs: OpenPose object
        """
        self.op = self._libop.newOP(
            params["logging_level"],
            self.encode(params["output_resolution"]),
            self.encode(params["net_resolution"]),
            self.encode(params["model_pose"]),
            params["alpha_pose"],
            params["scale_gap"],
            params["scale_number"],
            params["render_threshold"],
            params["num_gpu_start"],
            params["disable_blending"],
            self.encode(params["default_model_folder"])
        )

    def __del__(self):
        """
        OpenPose Destructor: 销毁 OpenPose 对象
        """
        self._libop.delOP(self.op)

    def forward(self, image, display = False):
        """
        Forward: 输入图像,输出人体 2D 姿态,以及可视化图像结果.

        参数:
        ----------
        image : ndarray 格式的彩色图像.
        display :Boole 布尔值,如果为 True,则返回带有人体关键点的可视化图像.

        返回值:
        -------
        array: ndarray of human 2D poses [People * BodyPart * XYConfidence]
        displayImage : image for visualization
        """
        shape = image.shape
        displayImage = np.zeros(shape=(image.shape),dtype=np.uint8)
        size = np.zeros(shape=(3),dtype=np.int32)
        self._libop.forward(self.op,
                            image,
                            shape[0],
                            shape[1],
                            size,
                            displayImage,
                            display)
        array = np.zeros(shape=(size),dtype=np.float32)
        self._libop.getOutputs(self.op, array)
        if display:
            return array, displayImage
        return array

    def poseFromHM(self, image, hm, ratios=[1]):
        """
        Pose From Heatmap: 输入图像,和计算的 heatmaps,以及 scales,计算人体姿态.

        参数:
        ----------
        image : ndarray 格式的彩色图像.
        hm : heatmap of type ndarray with heatmaps and part affinity fields
        ratios : 多尺度multiple scales融合时的缩放比例 scaling ration.

        返回值:
        -------
        array: ndarray of human 2D poses [People * BodyPart * XYConfidence]
        displayImage : image for visualization
        """
        if len(ratios) != len(hm):
            raise Exception("Ratio shape mismatch")

        # Find largest
        hm_combine = np.zeros(shape=(len(hm),
                                     hm[0].shape[1],
                                     hm[0].shape[2],
                                     hm[0].shape[3]),dtype=np.float32)
        i=0
        for h in hm:
           hm_combine[i,:,0:h.shape[2],0:h.shape[3]] = h
           i+=1
        hm = hm_combine

        ratios = np.array(ratios,dtype=np.float32)

        shape = image.shape
        displayImage = np.zeros(shape=(image.shape),dtype=np.uint8)
        size = np.zeros(shape=(4),dtype=np.int32)
        size[0] = hm.shape[0]
        size[1] = hm.shape[1]
        size[2] = hm.shape[2]
        size[3] = hm.shape[3]

        self._libop.poseFromHeatmap(self.op,
                                    image,
                                    shape[0],
                                    shape[1],
                                    displayImage,
                                    hm,
                                    size,
                                    ratios)
        array = np.zeros(shape=(size[0],size[1],size[2]),
                         dtype=np.float32)
        self._libop.getOutputs(self.op, array)
        return array, displayImage

    @staticmethod
    def process_frames(frame, boxsize = 368, scales = [1]):
        base_net_res = None
        imagesForNet = []
        imagesOrig = []
        for idx, scale in enumerate(scales):
            # 计算网络分辨率
            # Calculate net resolution (width, height)
            if idx == 0:
                net_res = (16 * int((boxsize * frame.shape[1] / float(frame.shape[0]) / 16) + 0.5),  boxsize)
                base_net_res = net_res
            else:
                net_res = (int(min(base_net_res[0], max(1, int((base_net_res[0] * scale)+0.5)/16*16))),
                           int(min(base_net_res[1], max(1, int((base_net_res[1] * scale)+0.5)/16*16))))
            input_res = [frame.shape[1], frame.shape[0]]
            scale_factor = min((net_res[0] - 1) / float(input_res[0] - 1), (net_res[1] - 1) / float(input_res[1] - 1))
            warp_matrix = np.array([[scale_factor,0,0],
                                    [0,scale_factor,0]])
            if scale_factor != 1:
                imageForNet = cv2.warpAffine(
                    frame,
                    warp_matrix,
                    net_res,
                    flags=(cv2.INTER_AREA if scale_factor < 1. else cv2.INTER_CUBIC),
                    borderMode=cv2.BORDER_CONSTANT,
                    borderValue=(0,0,0))
            else:
                imageForNet = frame.copy()

            imageOrig = imageForNet.copy()
            imageForNet = imageForNet.astype(float)
            imageForNet = imageForNet/256. - 0.5
            imageForNet = np.transpose(imageForNet, (2,0,1))

            imagesForNet.append(imageForNet)
            imagesOrig.append(imageOrig)

        return imagesForNet, imagesOrig

    @staticmethod
    def draw_all(imageForNet, heatmaps, currIndex, div=4., norm=False):
        netDecreaseFactor = float(imageForNet.shape[0]) / float(heatmaps.shape[2]) # 8
        resized_heatmaps = np.zeros(shape=(heatmaps.shape[0],
                                           heatmaps.shape[1],
                                           imageForNet.shape[0],
                                           imageForNet.shape[1]))
        num_maps = heatmaps.shape[1]
        combined = None
        for i in range(0, num_maps):
            heatmap = heatmaps[0,i,:,:]
            resizedHeatmap = cv2.resize(heatmap, (0,0),
                                        fx=netDecreaseFactor,
                                        fy=netDecreaseFactor)

            minVal, maxVal, minLoc, maxLoc = cv2.minMaxLoc(resizedHeatmap)

            if i==currIndex and currIndex >=0:
                resizedHeatmap = np.abs(resizedHeatmap)
                resizedHeatmap = (resizedHeatmap*255.).astype(dtype='uint8')
                im_color = cv2.applyColorMap(resizedHeatmap, cv2.COLORMAP_JET)
                resizedHeatmap = cv2.addWeighted(imageForNet, 1, im_color, 0.3, 0)
                cv2.circle(resizedHeatmap, (int(maxLoc[0]),int(maxLoc[1])), 5, (255,0,0), -1)
                return resizedHeatmap
            else:
                resizedHeatmap = np.abs(resizedHeatmap)
                if combined is None:
                    combined = np.copy(resizedHeatmap);
                else:
                    if i <= num_maps-2:
                        combined += resizedHeatmap;
                        if norm:
                            combined = np.maximum(0, np.minimum(1, combined));

        if currIndex < 0:
            combined /= div
            combined = (combined*255.).astype(dtype='uint8')
            im_color = cv2.applyColorMap(combined, cv2.COLORMAP_JET)
            combined = cv2.addWeighted(imageForNet, 0.5, im_color, 0.5, 0)
            cv2.circle(combined, (int(maxLoc[0]),int(maxLoc[1])), 5, (255,0,0), -1)
            return combined

if __name__ == "__main__":
    params = dict()
    params["logging_level"] = 3
    params["output_resolution"] = "-1x-1"
    params["net_resolution"] = "-1x368"
    params["model_pose"] = "BODY_25"
    params["alpha_pose"] = 0.6
    params["scale_gap"] = 0.3
    params["scale_number"] = 1
    params["render_threshold"] = 0.05
    params["num_gpu_start"] = 0
    params["disable_blending"] = False
    params["default_model_folder"] = "../../../models/"
    openpose = OpenPose(params)

    img = cv2.imread("test.jpg")
    arr, output_image = openpose.forward(img, True)
    print(arr)

    while 1:
        cv2.imshow("output", output_image)
        cv2.waitKey(15)
2. Python API 模块测试
Python API 模块的实例位于 build/examples/tutorial_api_python 路径.
运行测试:
# From command line
cd build/examples/tutorial_api_python

# Python 3 (default version)
python3 1_body_from_image.py
python3 2_whole_body_from_image.py
# python3 [any_other_example.py]

# Python 2
python2 1_body_from_image.py
python2 2_whole_body_from_image.py
# python2 [any_other_example.py]
OpenPose 旧版本中的测试示例:
在 OPENPOSE_ROOT/build/examples/tutorial_api_python/1_extract_pose.py 和 OPENPOSE_ROOT//build/examples/tutorial_developer/python_1_pose_from_heatmaps.py.
有两个例子:
[1] - 1_extract_pose.py - Python API 的简单使用.
[2] - 2_pose_from_heatmaps.py - 基于 Caffe 网络从 heatmaps 构建 Body Pose.
cd build/examples/tutorial_api_python
python 1_extract_pose.py
2.1. 直接利用 OpenPose 库提取人体关键点
在自定义的调用 OpenPose Python API 的脚本中,需要添加编译安装的 OpenPose 路径,其有两种方案:
方案一:
如:
import os, sys

dir_path = os.path.dirname(os.path.realpath(__file__))
sys.path.append('../../python')
# sys.path.append('OPENPOSE_ROOT/build/python')
方案二:
在 build/ 中运行了 openpose 安装命令 make install
默认安装路径:/usr/local/python(Ubuntu)
也可以采用访问 OpenPose/python 的方式.
可以将 openpose 和其 python 库安装在指定路径.
确保在 python 路径中. 如:
import sys
sys.path.append('/usr/local/python')以方案二为例:
# Ubuntu 环境
import sys
import cv2
import matplotlib.pyplot as plt

# 方案二:
sys.path.append('/usr/local/python')

# 导入 OpenPose 库
try:
    from openpose import *
except:
    raise Exception('Error: OpenPose library could not be found. '
                    'Did you enable `BUILD_PYTHON` in CMake and '
                    'have this Python script in the right folder?')
# OpenPose 参数
params = dict()
params["logging_level"] = 3
params["output_resolution"] = "-1x-1"
params["net_resolution"] = "-1x368"
params["model_pose"] = "BODY_25"
params["alpha_pose"] = 0.6
params["scale_gap"] = 0.3
params["scale_number"] = 1
params["render_threshold"] = 0.05
# 多 GPUs 时,GPUID 设置
params["num_gpu_start"] = 0
params["disable_blending"] = False
# 模型路径
params["default_model_folder"] = "OPENPOSE_ROOT/models/"
# 构建 OpenPose 对象,分配 GPU 显存
openpose = OpenPose(params)

img = cv2.imread("test.jpg")
# 计算输出关键点,及带有人体骨骼的图像结果
keypoints, output_image = openpose.forward(img, True)
# 打印人体关键点结果
# 如,包含图像中所有人体的关节点结果, [#people x #keypoints x 3]-维 numpy 对象
print(keypoints)
# 显示图片
plt.imshow(output_image[:,:,::-1])
plt.axis('off')
plt.show()
输出结果,如:
# Keypoints
[[[2.6689908e+02 1.5720723e+02 8.7282991e-01]
  [2.1294948e+02 1.8849382e+02 8.4266990e-01]
  [1.7634467e+02 1.5893631e+02 7.9097664e-01]
  [9.1040657e+01 1.6246671e+02 8.8326693e-01]
  [8.4093750e+01 2.3556367e+02 8.0808026e-01]
  [2.4605063e+02 2.1817403e+02 7.1219295e-01]
  [2.3030014e+02 2.9823630e+02 9.0355945e-01]
  [2.8431320e+02 2.8435046e+02 9.5072258e-01]
  [1.8673714e+02 3.3133643e+02 6.4542526e-01]
  [1.5715875e+02 3.3304315e+02 5.8337438e-01]
  [1.6065424e+02 4.6538202e+02 8.7898481e-01]
  [6.4923096e+01 5.6457629e+02 7.7615017e-01]
  [2.1464272e+02 3.3305948e+02 6.8280864e-01]
  [2.4602286e+02 4.4974640e+02 8.0254650e-01]
  [2.7908148e+02 5.6641516e+02 7.3841733e-01]
  [2.6343689e+02 1.4155238e+02 8.5776460e-01]
  [2.7734644e+02 1.5720271e+02 8.8562906e-01]
  [2.4253836e+02 1.3274791e+02 8.3041203e-01]
  [2.8250128e+02 1.7112190e+02 9.4624631e-02]
  [2.6860504e+02 6.0469604e+02 7.7051580e-01]
  [2.8427838e+02 6.0294855e+02 7.2294450e-01]
  [2.8258286e+02 5.7684503e+02 5.7483846e-01]
  [3.7068314e+01 6.0460706e+02 7.1381354e-01]
  [3.0127148e+01 5.9255536e+02 6.3077456e-01]
  [6.1453045e+01 5.6467444e+02 4.6968105e-01]]]
2.2. 从 heatmaps 提取人体关键点
import sys
# 需要指定 Caffe 的编译路径
sys.path.insert(0, '/path/to/caffe/python')
import caffe

import os
os.environ["GLOG_minloglevel"] = "1"
import cv2
import numpy as np
import matplotlib.pyplot as plt

sys.path.append('/usr/local/python')

try:
    from openpose import OpenPose
except:
    raise Exception('Error: OpenPose library could not be found. '
                    'Did you enable `BUILD_PYTHON` in CMake and '
                    'have this Python script in the right folder?')

# 参数设置
# 单尺度
defRes = 368
scales = [1]
# # 多尺度Multi-scale
# defRes = 736
# scales = [1, 0.75, 0.5, 0.25]
class Param:
    caffemodel = "OPENPOSE_ROOT/models/pose/body_25/pose_iter_584000.caffemodel"
    prototxt = "OPENPOSE_ROOT/models/pose/body_25/pose_deploy.prototxt"

# 加载 OpenPose 对象和 Caffe Nets
params = dict()
params["logging_level"] = 3
params["output_resolution"] = "-1x-1"
params["net_resolution"] = "-1x"+ str(defRes)
params["model_pose"] = "BODY_25"
params["alpha_pose"] = 0.6
params["scale_gap"] = 0.25
params["scale_number"] = len(scales)
params["render_threshold"] = 0.05
params["num_gpu_start"] = 0
params["disable_blending"] = False
params["default_model_folder"] = "OPENPOSE_ROOT/models/"
openpose = OpenPose(params)

caffe.set_mode_gpu()
caffe.set_device(0)
nets = []
for scale in scales:
    nets.append(caffe.Net(Param.prototxt, Param.caffemodel, caffe.TEST))
print("[INFO] Caffe Net loaded")

# 测试函数
first_run = True
def func(frame):

    # Get image processed for network, and scaled image
    imagesForNet, imagesOrig = OpenPose.process_frames(frame, defRes, scales)

    # Reshape
    global first_run
    if first_run:
        for i in range(0, len(scales)):
            net = nets[i]
            imageForNet = imagesForNet[i]
            in_shape = net.blobs['image'].data.shape
            in_shape = (1, 3, imageForNet.shape[1], imageForNet.shape[2])
            net.blobs['image'].reshape(*in_shape)
            net.reshape()

        first_run = False
        print("[INFO] Images Reshaped")

    # Forward 计算得到 heatmaps
    heatmaps = []
    for i in range(0, len(scales)):
        net = nets[i]
        imageForNet = imagesForNet[i]
        net.blobs['image'].data[0,:,:,:] = imageForNet
        net.forward()
        heatmaps.append(net.blobs['net_output'].data[:,:,:,:])

    # Pose from HM Test
    array, frame = openpose.poseFromHM(frame, heatmaps, scales)

    # Draw Heatmaps instead
    # hm = heatmaps[0][:,0:18,:,:];
    # frame = OpenPose.draw_all(imagesOrig[0], hm, -1, 1, True)
    # paf = heatmaps[0][:,20:,:,:];
    # frame = OpenPose.draw_all(imagesOrig[0], paf, -1, 4, False)

    return frame

img = cv2.imread('test.jpg")
frame = func(img)
plt.imshow(frame[:,:,::-1])
plt.axis('off')
plt.show()
如:

2.3. Exporting Python OpenPose
如果需要将 *.py 脚本移出其原来的路径,或者,在build/examples/tutorial_api_python 路径外新建 *py 脚本.
[1] - 安装 OpenPose - 在 Ubuntu 系统中,可以通过 sudo make install 安装 OpenPose;然后,在 python 脚本中设置 OpenPose 的安装路径(默认:/usr/local/python),然后即可在任何位置开始使用 OpenPose. 参考:build/examples/tutorial_pose/1_extract_pose.py.
[2] - 不安装 OpenPose - 为了将 OpenPose Python API Demo 放置在不同的路径,需要在 *.py 脚本中添加 sys.path.append('{OpenPose_path}/python'),其中,{OpenPose_path} 为 OpenPose 的 build 路径. 参考:build/examples/tutorial_pose/1_extract_pose.py.
可参考 2.1 和 2.2.
9 comments
openpose.py是哪里生成的
早期项目里提供的一个py脚本,现在好像是更新过了
博主你好, 请问如何才能实时处理video里面每一帧的keypoints
实时可以用一些轻量的关键点估计模型,可能会牺牲一些精度.
你好,这个性能怎么样呢?识别一张图片耗时多少呢?硬件配置是?
请问python api也要先安装vs,配置完之后再安装吗?
ubuntu 环境是没有 vs 的.
你好,请问openpose的Python API该怎么安装呢?
https://www.aiuai.cn/aifarm706.html
https://www.aiuai.cn/aifarm1155.html
这两篇里有汇总过.