原文:[How to do Semantic Segmentation using Deep learning]()
主要是对基于深度学习的图像分割模型的实现指南的综述.

From DeepLab 图像语义分割网络 译文
语义分割是 CV 领域的一个关键领域. 对于一张大图片,语义分割是对图片中完整场景理解的高级任务(high-level task). 场景理解作为关键的 CV 问题的重要性在于,越来越多的应用受益于这些从图像中推断出的知识和信息,比如,自动驾驶,人机交互,虚拟现实等. 伴随着深度学习技术的发展,语义分割的很多问题采用深度结构进行解决,最多的是 CNNs,精度和效率均取得了较大的进步.
语义分割是什么
语义分割是对图像的一种更精细的推断与理解,由粗到细为:
- 图像分类 - 初级的图片理解,其对整张图片进行整体理解.
- 目标定位与检测 - 不仅提供图像内的类别,还包括相对于物体类别的空间为位置信息.
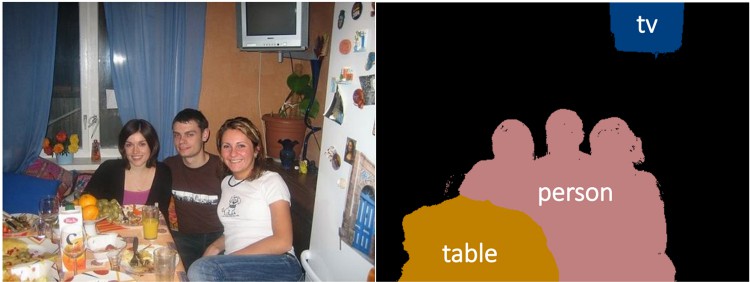
- 语义分割 - 对每个图像像素进行密集预测,得到像素类别信息.
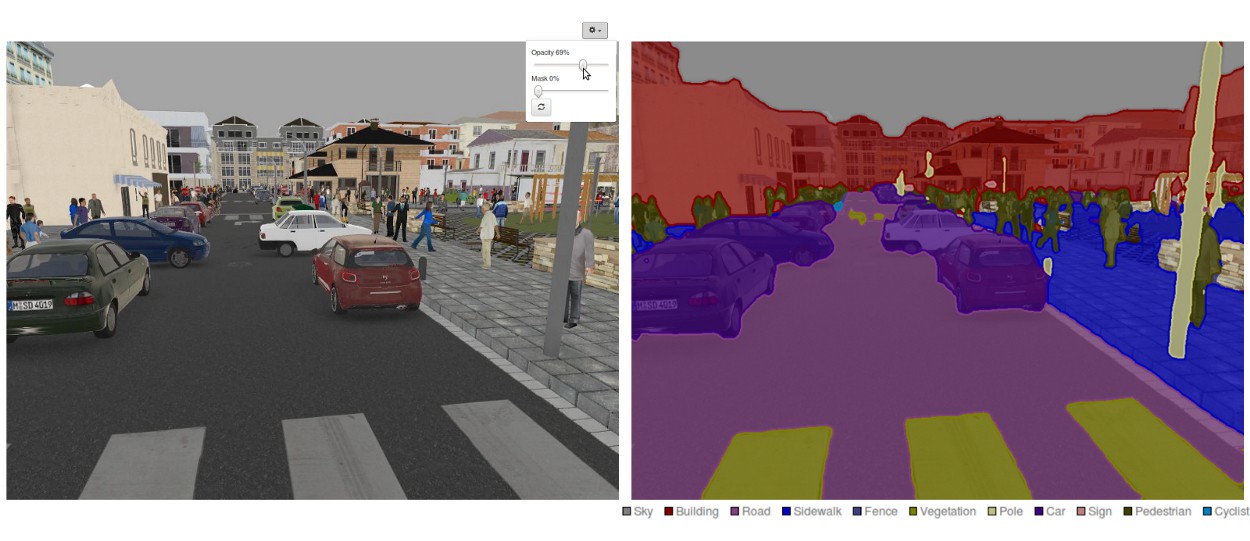
From 语义分割示例
常用语语义分割的 CV 领域经典的深度网络模型:
- AlexNet - 先驱性深度 CNN,以 84.6% 的测试精度赢得了 2012 年的 ImageNet 竞赛. 其主要包括 5 个 conv 层,max-pooling 层,ReLUs 非线性层,和 3 个全连接层及 dropout 层.
- VGG-16 - Oxford 的 CNN 模型,以 92.7% 的精度赢得了 2013 年的 ImageNet 竞赛. 其采用了 conv 层的堆叠,第一个 conv 层具有小接受野,而不是采用具有大接受野的网络层.
- GoogLeNet - Google 提出的 CNN 模型,以 93.3% 的精度赢得了 2014 年的 ImageNet 竞赛. 其由 22 层组成,并提出了
inception模块.inception模块包含了一个 Network-in-Network 层,一个 pooling 操作,一个大尺寸(large-sized)的 conv 层和一个小尺寸(small-sized)的 conv 层. - ResNet - Microsoft 提出的 CNN 模型,以 96.4% 的精度赢得了 2016 年的 ImageNet 竞赛. 其由网络深度(152 层) 和 residual 模块而闻名. residual 模块解决的问题是,通过引入跳跃链接将网络层的输入直接复制到下一个网络层,以训练深度网络结构.

From CNN 网络结构
语义分割方法简汇
语义分割网络结构通常可以看作是,编码器-解码器网络(encoder-decoder).
- encoder 网络通常采用预训练的分类网络,如 VGG/ResNet,其后接 decoder 网络.
- decoder 网络的任务是,将 encoder 网络学习的辨别性特征(低分辨率的)语义地有应到像素空间(高分辨率的),以得到密集分类结果.
与图像分类不同的是,图像分类的深度网络的输出仅是重要的部分,而语义分割不仅需要像素级的辨别,还需要将 encoder 网络不同阶段学习的辨别性特征投影到像素空间的一种机制.
不同方法采用不同的 decoder 机制,三种主要方法如下.
[1] 基于区域的语义分割
基于区域的方法一般采用的是 “采用目标识别的分割” 技术路线,首先提取图像中的自由区域,并进行描述;然后,采用基于区域的分类. 测试时,基于区域的预测结果被转换为像素预测,一般采用的是,根据包含目标的最高 scoring 区域来对每个像素进行标注.
R-CNN (Region with CNN features) 是一种代表性方法. 其基于目标检测结果进行语义分割.

R-CNN 结构.
具体来说,R-CNN 首先采用 selective search 方法提取大量的 objects proposals,然后计算每个 proposal 的 CNN 特征. 最后,采用类别已知(class-specific) 的线性 SVMs 对每个区域进行分类.
相对于主要用于图像分类的传统 CNN 结构来说,R-CNN 能够解决更加复杂的任务,如目标检测和图像分割;而且,R-CNN 可以基于任何 CNN benchmark 结构的基础网络,比如 AlexNet,VGG,GoogleNet 和 ResNet.
对于图像分割任务,R-CNN 提取每个区域的两种特征:完整区域特征(full region feature)和前景特征(foreground feature),结合这两种特征作为区域特征能够取得更好的结果. 基于大量辨别性的 CNN 特征,R-CNN 取得了显著的效果提升. 但,其对于分割任务而言,面临的问题有:
- R-CNN 特征与分割任务不匹配.
- R-CNN 特征缺乏足够的空间信息,以精确边界生成.
- 生成 segment-based proposals 很耗时,并显著影响最终的效果.
对此,出现了很多新的解决方案,如 SDS, Hypercolumns,Mask R-CNN.
[2] 基于 FCN 的语义分割
Fully Convolutional Network (FCN) 学习像素到像素的映射关系,而不需要提取 region proposals.
FCN 网络是经典 CNN 结构的延伸. 其主要思想是,使 CNN 可以采用任意尺寸的图像作为网络输入. CNNs 的限制,由于全连接层是固定的,其只允许接受指定尺寸的图像输入,输出对应的图像label 标签. 而,FCNs 只包含 conv 层和 pooling 层,可以采用任意尺寸的图像作为输入,输出预测结果.
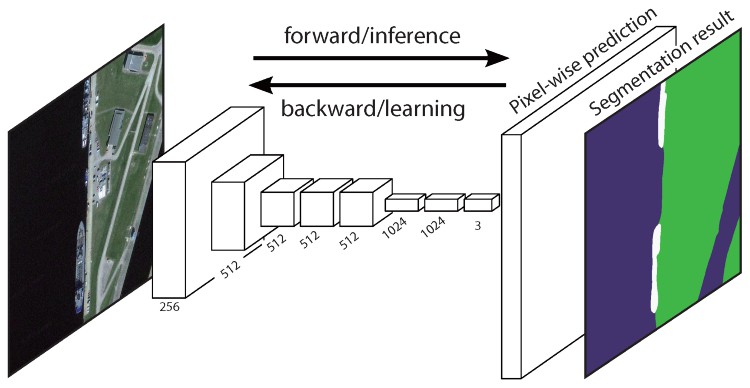
FCN 结构
FCN 的一个问题是,图像经过多个 conv 层和 pooling 层的交替处理,输出的 feature maps 的分辨率被下采样. 因此,FCN 直接的预测结果往往是低分辨率的,得到相对模糊的物体边界.
对此,出现了很多 FCN 的改进版本,如 SegNet,DeepLab-CRF 和 Dilated Convolutions.
[3] 弱监督语义分割
语义分割的大部分方法依赖于大量的像素级标注了分割 mask 的图像数据集. 然而,masks 的手工标准是相当费时,繁琐和价格昂贵的. 因此,出现了一些弱监督分割方法,通过利用标注的边界框信息来完善语义分割.
例如,Boxsup 采用标注的边界框作为监督信息来训练网络,并迭代地提升语义分割估计的 masks 效果. Simple Does 将弱监督问题作为输入标签的噪声,探索采用 de-noising 策略进行网络训练. Pixel-level Labeling 将分割任务解释为 multiple-instance 学习框架,并添加额外的网络层来约束模型,以分配更多的权重给重要的像素,进行图像级的分类.
Boxsup Training
采用 FCN 实现语义分割
这里采用最流行的语义分割结构 - FCN Net 来进行逐步实现.
基于 Tensorflow,Python3,Numpy 和 Scipy 等.
目标问题是,采用 FCN 对道路图像进行像素级的标注.
道路/车道检测(road/lane detection) 数据集 - Kitti Road Dataset,来自 Udacity’s Self-Driving Car Nano-degree 项目.

From Kitti Road Dataset Training Sample
FCN 结构的关键点:
- FCN 对 VGG16 进行迁移学习,用于语义分割.
- VGG16 的全连接层采用 1x1 conv 替换为全卷积层,输出低分辨率的类别 heatmap.
- 采用 transposed convs(采用双线性插值 filters 进行初始化) 上采样低分辨率的语义特征图(feature maps).
- 在每个阶段,通过添加 VGG16 的前一更粗糙网络层的特征,来提升上采样的结果,该粗糙网络层输出的特征具有更高分辨率的 feature maps.
- 每个 conv 模块后引入跳跃链接,以确保后续 conv 模块能够从前一 poolied 特征中提取更抽象、显著的特征.
FCN 有三个版本,CN-32, FCN-16, FCN-8,这里以 FCN-8 为例.
- Encoder - 采用预训练的 VGG16 作为 encoder. decoder 从 VGG6 的 Layer 7 开始.
- FCN Layer-8 - VGG16 的最后一个全连接层替换为 1x1 conv 层.
- FCN Layer-9 - FCN Layer-8 上采样两次,以匹配 VGG16 的 Layer 4 的维度,采用的 transposed conv 参数为:(kernel=(4,4), stride=(2,2), paddding=’same’). 此后,在 VGG16 的Layer 4 和 FCN 的 Layer 9 间添加跳跃链接.
- FCN Layer-10 - FCN Layer-9 上采样两次,以匹配 VGG16 的 Layer 3 的维度,采用的 transposed conv 参数为:(kernel=(4,4), stride=(2,2), paddding=’same’). 此后,在 VGG16 的Layer 3 和 FCN 的 Layer 10 间添加跳跃链接.
- FCN Layer-11 - FCN Layer-10 上采样四次,以匹配输入图片的尺寸,得到真实的图片;feature maps 的深度等于类别数,采用的 transposed conv 参数为:(kernel=(16,16), stride=(8,8), paddding=’same’).
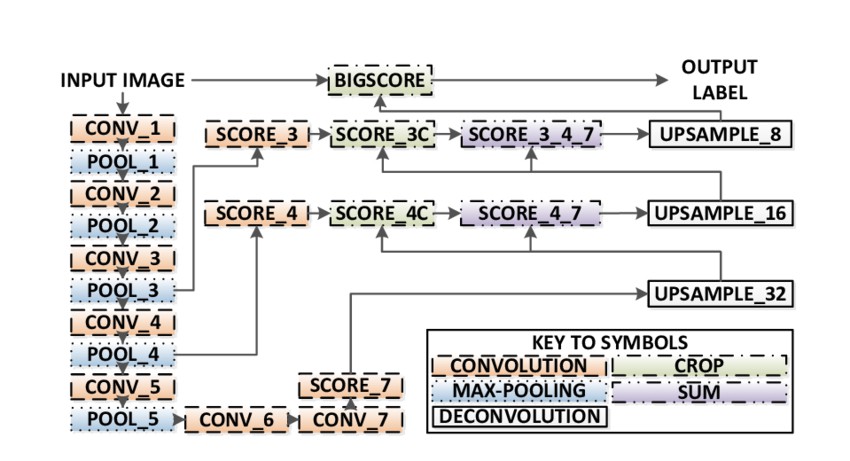
From FCN 结构
Step 1
首先加载预训练的 VGG16 模型到 TensorFlow.
建立 TensorFlow session 和预训练的 VGG 模型放置路径,返回 VGG 模型的 tensors 数组,包括 image input,keep_prob (to control dropout rate),layer 3,layer 4, 和 layer 7.
file-vgg16-py
def load_vgg(sess, vgg_path):

  # load the model and weights
  model = tf.saved_model.loader.load(sess, ['vgg16'], vgg_path)

  # Get Tensors to be returned from graph
  graph = tf.get_default_graph()
  image_input = graph.get_tensor_by_name('image_input:0')
  keep_prob = graph.get_tensor_by_name('keep_prob:0')
  layer3 = graph.get_tensor_by_name('layer3_out:0')
  layer4 = graph.get_tensor_by_name('layer4_out:0')
  layer7 = graph.get_tensor_by_name('layer7_out:0')

  return image_input, keep_prob, layer3, layer4, layer7
Step 2
创建 FCN 网络层,基于 VGG 模型的 tensors.
给定 VGG 网络层输出的 tensors 和待分类的类别数,返回最后一层输出的 tensor.
具体地,采用 1x1 conv 来编码网络层,然后添加带有跳跃链接(skip connetions)和上采样(upsampling) 的 decoder 网络.
file-layers-py
def layers(vgg_layer3_out, vgg_layer4_out, vgg_layer7_out, num_classes):

    # Use a shorter variable name for simplicity
    layer3, layer4, layer7 = vgg_layer3_out, vgg_layer4_out, vgg_layer7_out

    # Apply 1x1 convolution in place of fully connected layer
    fcn8 = tf.layers.conv2d(layer7, filters=num_classes, kernel_size=1, name="fcn8")

    # Upsample fcn8 with size depth=(4096?) to match size of layer 4 so that we can add skip connection with 4th layer
    fcn9 = tf.layers.conv2d_transpose(fcn8,
                                      filters=layer4.get_shape().as_list()[-1],
                                      kernel_size=4,
                                      strides=(2, 2),
                                      padding='SAME',
                                      name="fcn9")

    # Add a skip connection between current final layer fcn8 and 4th layer
    fcn9_skip_connected = tf.add(fcn9, layer4, name="fcn9_plus_vgg_layer4")

    # Upsample again
    fcn10 = tf.layers.conv2d_transpose(fcn9_skip_connected,
                                       filters=layer3.get_shape().as_list()[-1],
                                       kernel_size=4,
                                       strides=(2, 2),
                                       padding='SAME',
                                       name="fcn10_conv2d")

    # Add skip connection
    fcn10_skip_connected = tf.add(fcn10, layer3, name="fcn10_plus_vgg_layer3")

    # Upsample again
    fcn11 = tf.layers.conv2d_transpose(fcn10_skip_connected,
                                       filters=num_classes,
                                       kernel_size=16,
                                       strides=(8, 8),
                                       padding='SAME',
                                       name="fcn11")

    return fcn11
Step 3
优化网络结构,构建 TensorFlow loss 函数和 Optimizer 操作.
这里采用交叉熵作为 loss 函数,Adam 作为优化算法.
file-optimize-py
def optimize(nn_last_layer, correct_label, learning_rate, num_classes):

  # Reshape 4D tensors to 2D, each row represents a pixel, each column a class
  logits = tf.reshape(nn_last_layer, (-1, num_classes), name="fcn_logits")
  correct_label_reshaped = tf.reshape(correct_label, (-1, num_classes))

  # Calculate distance from actual labels using cross entropy
  cross_entropy = tf.nn.softmax_cross_entropy_with_logits(logits=logits, labels=correct_label_reshaped[:])
  # Take mean for total loss
  loss_op = tf.reduce_mean(cross_entropy, name="fcn_loss")

  # The model implements this operation to find the weights/parameters that would yield correct pixel labels
  train_op = tf.train.AdamOptimizer(learning_rate=learning_rate).minimize(loss_op, name="fcn_train_op")

  return logits, train_op, loss_op
Step 4
定义 train_nn 函数,囊括了重要的网络训练参数,如,epochs 数,batchsize, loss 函数,optimizer 操作,输入图像路径,label 图像路径,learning rate.
训练过程中,设置 keep_probability=0.5,learning_rate=0.001. 此外,还打印了训练日志.
file-train-py
def train_nn(sess, epochs, batch_size, get_batches_fn, train_op,
             cross_entropy_loss, input_image,
             correct_label, keep_prob, learning_rate):

  keep_prob_value = 0.5
  learning_rate_value = 0.001
  for epoch in range(epochs):
      # Create function to get batches
      total_loss = 0
      for X_batch, gt_batch in get_batches_fn(batch_size):

          loss, _ = sess.run([cross_entropy_loss, train_op],
          feed_dict={input_image: X_batch, correct_label: gt_batch,
          keep_prob: keep_prob_value, learning_rate:learning_rate_value})

          total_loss += loss;

      print("EPOCH {} ...".format(epoch + 1))
      print("Loss = {:.3f}".format(total_loss))
      print()
Step 5
开始网络训练.
在 run 函数中,首先采用 load_vgg ,layers 和 optimize 函数构建网络;然后采用 train_nn 函数训练网络,保存推断的数据.
file-run-py
def run():

  # Download pretrained vgg model
  helper.maybe_download_pretrained_vgg(data_dir)

  # A function to get batches
  get_batches_fn = helper.gen_batch_function(training_dir, image_shape)

  with tf.Session() as session:

    # Returns the three layers, keep probability and input layer from the vgg architecture
    image_input, keep_prob, layer3, layer4, layer7 = load_vgg(session, vgg_path)

    # The resulting network architecture from adding a decoder on top of the given vgg model
    model_output = layers(layer3, layer4, layer7, num_classes)

    # Returns the output logits, training operation and cost operation to be used
    # - logits: each row represents a pixel, each column a class
    # - train_op: function used to get the right parameters to the model to correctly label the pixels
    # - cross_entropy_loss: function outputting the cost which we are minimizing, lower cost should yield higher accuracy
    logits, train_op, cross_entropy_loss = optimize(model_output, correct_label, learning_rate, num_classes)

    # Initialize all variables
    session.run(tf.global_variables_initializer())
    session.run(tf.local_variables_initializer())

    print("Model build successful, starting training")

    # Train the neural network
    train_nn(session, EPOCHS, BATCH_SIZE, get_batches_fn,
             train_op, cross_entropy_loss, image_input,
             correct_label, keep_prob, learning_rate)

    # Run the model with the test images and save each painted output image (roads painted green)
    helper.save_inference_samples(runs_dir, data_dir, session, image_shape, logits, keep_prob, image_input)

    print("All done!")
参数设置部分,epochs = 40, batch_size = 16, num_classes = 2, image_shape = (160, 576).
采用 dropout = 0.5 和 dropout = 0.75 两次 trial 后,发现,第 2 次 trial 得到了更好的平均 losses ,更好的结果.

训练结果
完整代码 - main.py
#--------------------------
# USER-SPECIFIED DATA
#--------------------------

# Tune these parameters

num_classes = 2
image_shape = (160, 576)
EPOCHS = 40
BATCH_SIZE = 16
DROPOUT = 0.75

# Specify these directory paths

data_dir = './data'
runs_dir = './runs'
training_dir ='./data/data_road/training'
vgg_path = './data/vgg'

#--------------------------
# PLACEHOLDER TENSORS
#--------------------------

correct_label = tf.placeholder(tf.float32, [None, IMAGE_SHAPE[0], IMAGE_SHAPE[1], NUMBER_OF_CLASSES])
learning_rate = tf.placeholder(tf.float32)
keep_prob = tf.placeholder(tf.float32)

#--------------------------
# FUNCTIONS
#--------------------------

def load_vgg(sess, vgg_path):

  # load the model and weights
  model = tf.saved_model.loader.load(sess, ['vgg16'], vgg_path)

  # Get Tensors to be returned from graph
  graph = tf.get_default_graph()
  image_input = graph.get_tensor_by_name('image_input:0')
  keep_prob = graph.get_tensor_by_name('keep_prob:0')
  layer3 = graph.get_tensor_by_name('layer3_out:0')
  layer4 = graph.get_tensor_by_name('layer4_out:0')
  layer7 = graph.get_tensor_by_name('layer7_out:0')

  return image_input, keep_prob, layer3, layer4, layer7

def layers(vgg_layer3_out, vgg_layer4_out, vgg_layer7_out, num_classes):

    # Use a shorter variable name for simplicity
    layer3, layer4, layer7 = vgg_layer3_out, vgg_layer4_out, vgg_layer7_out

    # Apply 1x1 convolution in place of fully connected layer
    fcn8 = tf.layers.conv2d(layer7, filters=num_classes, kernel_size=1, name="fcn8")

    # Upsample fcn8 with size depth=(4096?) to match size of layer 4 so that we can add skip connection with 4th layer
    fcn9 = tf.layers.conv2d_transpose(fcn8, filters=layer4.get_shape().as_list()[-1],
    kernel_size=4, strides=(2, 2), padding='SAME', name="fcn9")

    # Add a skip connection between current final layer fcn8 and 4th layer
    fcn9_skip_connected = tf.add(fcn9, layer4, name="fcn9_plus_vgg_layer4")

    # Upsample again
    fcn10 = tf.layers.conv2d_transpose(fcn9_skip_connected, filters=layer3.get_shape().as_list()[-1],
    kernel_size=4, strides=(2, 2), padding='SAME', name="fcn10_conv2d")

    # Add skip connection
    fcn10_skip_connected = tf.add(fcn10, layer3, name="fcn10_plus_vgg_layer3")

    # Upsample again
    fcn11 = tf.layers.conv2d_transpose(fcn10_skip_connected, filters=num_classes,
    kernel_size=16, strides=(8, 8), padding='SAME', name="fcn11")

    return fcn11

def optimize(nn_last_layer, correct_label, learning_rate, num_classes):

  # Reshape 4D tensors to 2D, each row represents a pixel, each column a class
  logits = tf.reshape(nn_last_layer, (-1, num_classes), name="fcn_logits")
  correct_label_reshaped = tf.reshape(correct_label, (-1, num_classes))

  # Calculate distance from actual labels using cross entropy
  cross_entropy = tf.nn.softmax_cross_entropy_with_logits(logits=logits, labels=correct_label_reshaped[:])
  # Take mean for total loss
  loss_op = tf.reduce_mean(cross_entropy, name="fcn_loss")

  # The model implements this operation to find the weights/parameters that would yield correct pixel labels
  train_op = tf.train.AdamOptimizer(learning_rate=learning_rate).minimize(loss_op, name="fcn_train_op")

  return logits, train_op, loss_op

def train_nn(sess, epochs, batch_size, get_batches_fn, train_op,
             cross_entropy_loss, input_image,
             correct_label, keep_prob, learning_rate):

  keep_prob_value = 0.5
  learning_rate_value = 0.001
  for epoch in range(epochs):
      # Create function to get batches
      total_loss = 0
      for X_batch, gt_batch in get_batches_fn(batch_size):

          loss, _ = sess.run([cross_entropy_loss, train_op],
          feed_dict={input_image: X_batch, correct_label: gt_batch,
          keep_prob: keep_prob_value, learning_rate:learning_rate_value})

          total_loss += loss;

      print("EPOCH {} ...".format(epoch + 1))
      print("Loss = {:.3f}".format(total_loss))
      print()

def run():

  # Download pretrained vgg model
  helper.maybe_download_pretrained_vgg(data_dir)

  # A function to get batches
  get_batches_fn = helper.gen_batch_function(training_dir, image_shape)

  with tf.Session() as session:

    # Returns the three layers, keep probability and input layer from the vgg architecture
    image_input, keep_prob, layer3, layer4, layer7 = load_vgg(session, vgg_path)

    # The resulting network architecture from adding a decoder on top of the given vgg model
    model_output = layers(layer3, layer4, layer7, num_classes)

    # Returns the output logits, training operation and cost operation to be used
    # - logits: each row represents a pixel, each column a class
    # - train_op: function used to get the right parameters to the model to correctly label the pixels
    # - cross_entropy_loss: function outputting the cost which we are minimizing, lower cost should yield higher accuracy
    logits, train_op, cross_entropy_loss = optimize(model_output, correct_label, learning_rate, num_classes)

    # Initialize all variables
    session.run(tf.global_variables_initializer())
    session.run(tf.local_variables_initializer())

    print("Model build successful, starting training")

    # Train the neural network
    train_nn(session, EPOCHS, BATCH_SIZE, get_batches_fn,
             train_op, cross_entropy_loss, image_input,
             correct_label, keep_prob, learning_rate)

    # Run the model with the test images and save each painted output image (roads painted green)
    helper.save_inference_samples(runs_dir, data_dir, session, image_shape, logits, keep_prob, image_input)

    print("All done!")

#--------------------------
# MAIN
#--------------------------
if __name__ == '__main__':
    run()