原文:MediaPipe Pose
视频人体姿态估计在很多应用场景具有重要作用,如,体育锻炼、手语识别和全身姿势控制等. 如,其可以构成瑜伽、舞蹈和健身应用的基础. 还可以在增强现实中将数字内容和信息叠加在物理世界之上.
MediaPipe Pose 提供了一种全身姿态追踪的机器学习解决方案,采用 BlazePose 和 ML Kit Pose Detection API 能够实现从 RGB 视频帧中预测全身的 33 个 3D 关键点与人体背景 mask 的分割.
当前,很多方法主要是依赖强大的桌面环境进行推断,而 MediaPipe 可以在比如 mobile phones, desktops/laptops 等环境实时运行,基于 Python,甚至还可以在 web 端运行.
![]()
图1. MediaPipe Pose 姿态追踪示例
1. ML Pipeline
MediaPipe Pose 采用了 two-step detector-tracker ML pipeline. 其同样在 MediaPipe Hands 和 MediaPipe Face Mesh 方案中被有效使用.
采用一个 detector,受限定位到当前帧中人体 ROI 区域;然后,采用 tracker 采用 ROI-cropped 区域作为输入,预测该 ROI 区域的姿态关键点和分割Mask.
注,对于视频帧序列,仅对于第一帧以及当 tracker 无法再识别前一帧中人体存在时,才需要调用检测器;对于其他帧,只是从前一帧的姿态关键点中推断出 ROI.
MediaPipe Pose Pipeline 是采用 MediaPipe graph 进行实现的,其采用了 pose landmark module 中的一个 pose landmark subgraph ,以及采用一个 pose renderer subgraph 进行渲染. pose landmark subgraph 内部采用了 pose detection module 中的一个 pose detection subgraph .
[1] - pose_tracking
[2] - pose landmark module:
https://github.com/google/mediapipe/tree/master/mediapipe/modules/pose_landmark
[3] - pose landmark subgraph:
[4] - pose detection module:
https://github.com/google/mediapipe/tree/master/mediapipe/modules/pose_detection
[5] - pose renderer subgraph:
[6] - pose detection subgraph:
2. Pose Estimation Quality
MediaPipe Pose 模型 在 Yoga, Dance 和 HIIT 数据集上的性能表现如下,其中,为了对比其他方案,仅采用了类似于 COCO topology 中的 17 个关键点.
- Pose detection model: TFLite model
- Pose landmark model: TFLite model (lite), TFLite model (full), TFLite model (heavy)
- Model card
| Method | Yoga mAP | Yoga PCK@0.2 | Dance mAP | Dance PCK@0.2 | HIIT mAP | HIIT PCK@0.2 |
|---|---|---|---|---|---|---|
| BlazePose GHUM Heavy | 68.1 | 96.4 | 73.0 | 97.2 | 74.0 | 97.5 |
| BlazePose GHUM Full | 62.6 | 95.5 | 67.4 | 96.3 | 68.0 | 95.7 |
| BlazePose GHUM Lite | 45.0 | 90.2 | 53.6 | 92.5 | 53.8 | 93.5 |
| AlphaPose ResNet50 | 63.4 | 96.0 | 57.8 | 95.5 | 63.4 | 96.0 |
| Apple Vision | 32.8 | 82.7 | 36.4 | 91.4 | 44.5 | 88.6 |
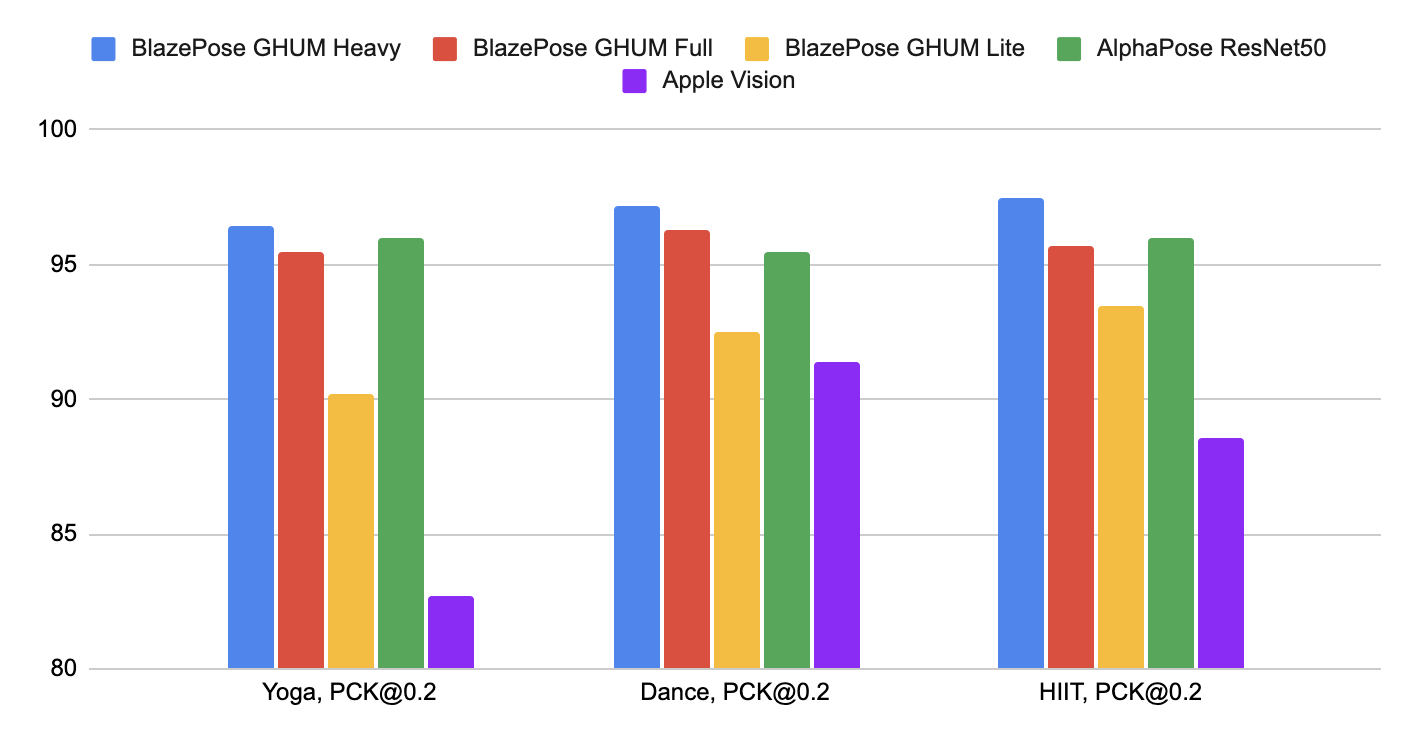
图2. 在 PCK@0.2 时的精度评估
MediaPipe Pose 针对实际场景进行了特别优化,其均可以在大部分设备上实时运行.
| Method | Latency Pixel 3 TFLite GPU | Latency MacBook Pro (15-inch 2017) |
|---|---|---|
| BlazePose GHUM Heavy | 53 ms | 38 ms |
| BlazePose GHUM Full | 25 ms | 27 ms |
| BlazePose GHUM Lite | 20 ms | 25 ms |
3. 模型
3.1. BlazePose Detector
BlazePose Detector,人体检测模型,其受到 MediaPipe Face Detection 中的轻量权重 BlazeFace 的启发. 其显式的预测两个额外的虚拟关键点,将人体中心(body center)、旋转(rotation)和尺度(scale) 描述在一个圆圈内.
![]()
图3:采用 BlazePose detector 预测的两个虚拟关键点以及人脸矩形框对齐的人体姿态
3.2. BlazePose GHUM 3D
BlazePose GHUM 3D,人体姿态关键点模型,其预测了 33 个姿态关键点的位置,如图:
![]()
图4. 33 个姿态关键点
此外,MediaPipe Pose 还可以预测人体全身的 segmentation mask,其被表征为 2类分割任务(人体和背景).
4. Solution APIs
4.1. 跨平台配置选项
[1] - STATIC_IMAGE_MODE
若为 False,则将输入图像作为视频流进行处理. 其将会尝试在第一张图像的最突出的人体,然后再进一步定位姿态关键点. 对于后续的图片,其仅仅是追踪这些姿态关键点,而不是进行检测,直到其被追踪不到,以降低计算量和延迟.
若为 True,则将会对每一张输入图像进行人体检测,主要用于处理不相关的一组图像.
默认为 False.
[2] - MODEL_COMPLEXITY
姿态关键点模型的复杂度,可选:0, 1, 2. 默认为 1.
关键点精度和推断延迟随着模型复杂度增加而增加.
[3] - SMOOTH_LANDMARKS
若为 True,则跨输入图像平滑姿态关键点,以降低抖动.
但是,如果 static_image_mode = True,则该参数会被忽略.
默认为 True.
[4] - ENABLE_SEGMENTATION
若为 True,则除了输出姿态关键点,还会生成分割 mask.
默认为 False.
[5] - MIN_DETECTION_CONFIDENCE
最小置信度值,取值范围 [0.0, 1.0],人体检测模型检测为人体的置信度.
默认为 0.5.
[6] - MIN_TRACKING_CONFIDENCE
最小置信度值,取值范围 [0.0, 1.0],关键点追踪模型检测为姿态关键点的置信度. 如果小于该置信度,则在下一张输入图像自动调用人体检测模型.
将该值设大些,能够增加鲁棒性,但会有更高的延迟.
如果 static_image_mode = True,则人体检测会对每张图像进行.
默认为 0.5.
4.2. 输出Output
4.2.1. POSE_LANDMARKS
姿态关键点列表,每个关键点组成如下:
[1] - x 和 y:关键点坐标,根据图像 width 和 height, 归一化到 [0.0, 1.0].
[2] - z: 表示以 hips 中点(midpoint) 为原点的关键点的深度,值越小,则关键点距离相机越近. z 的幅度与 x 的尺度大致相同.
[3] - visibility: 值为 [0.0, 1.0] 区间,表示图像中关键点可见的似然,关键点存在或未遗漏.
4.2.2. POSE_WORLD_LANDMARKS
另一组在世界坐标系中的姿态关键点列表,每个关键点组成如下:
[1] - x、y 和 z: 以米为单位的真实世界 3D 坐标,原点(0, 0, 0)为 hips 之间的中点.
[2] - visibility: 同上.
示例如,
[
  {
    score: 0.8,
    keypoints: [
      {x: 230, y: 220, score: 0.9, name: "nose"},
      {x: 212, y: 190, score: 0.8, name: "left_eye"},
      ...
    ],
    keypoints3D: [
      {x: 0.5, y: 0.9, z: 0.06 score: 0.9, name: "nose"},
      ...
    ]
  }
]
4.2.3. SEGMENTATION_MASK
当输出分割 mask 时,mask 与输入图像具有相同的 width 和 height,每个像素值值为 [0.0, 1.0] 区间,其中像素值为 1.0 和 0.0 分别表示 human 和 background.
4.3. Python Solution API
Python Colab
可配置参数项:
- static_image_mode
- model_complexity
- smooth_landmarks
- enable_segmentation
- smooth_segmentation
- min_detection_confidence
- min_tracking_confidence
代码示例:
#!/usr/bin/python3
#!--*-- coding: utf-8--*--
import cv2
import mediapipe as mp

mp_drawing = mp.solutions.drawing_utils
mp_drawing_styles = mp.solutions.drawing_styles
mp_pose = mp.solutions.pose

# For static images:
IMAGE_FILES = []
BG_COLOR = (192, 192, 192) # gray
with mp_pose.Pose(
    static_image_mode=True,
    model_complexity=2,
    enable_segmentation=True,
    min_detection_confidence=0.5) as pose:

      for idx, file in enumerate(IMAGE_FILES):
        image = cv2.imread(file)
        image_height, image_width, _ = image.shape
        # Convert the BGR image to RGB before processing.
        results = pose.process(cv2.cvtColor(image, cv2.COLOR_BGR2RGB))

        if not results.pose_landmarks:
              continue
        xs = results.pose_landmarks.landmark[mp_pose.PoseLandmark.NOSE].x * image_width
        ys = results.pose_landmarks.landmark[mp_pose.PoseLandmark.NOSE].y * image_height
           print(f'Nose coordinates: ({xs}, {ys})')

        annotated_image = image.copy()
        # Draw segmentation on the image.
        # To improve segmentation around boundaries, consider applying a joint
        # bilateral filter to "results.segmentation_mask" with "image".
        condition = np.stack((results.segmentation_mask,) * 3, axis=-1) > 0.1
        bg_image = np.zeros(image.shape, dtype=np.uint8)
        bg_image[:] = BG_COLOR
        annotated_image = np.where(condition, annotated_image, bg_image)
        # Draw pose landmarks on the image.
        mp_drawing.draw_landmarks(
            annotated_image,
            results.pose_landmarks,
            mp_pose.POSE_CONNECTIONS,
            landmark_drawing_spec=mp_drawing_styles.get_default_pose_landmarks_style())
        cv2.imwrite('/tmp/annotated_image' + str(idx) + '.png', annotated_image)
        # Plot pose world landmarks.
        mp_drawing.plot_landmarks(
            results.pose_world_landmarks, mp_pose.POSE_CONNECTIONS)

# For webcam input:
cap = cv2.VideoCapture(0)
with mp_pose.Pose(
    min_detection_confidence=0.5,
    min_tracking_confidence=0.5) as pose:

      while cap.isOpened():
        success, image = cap.read()
        if not success:
          print("Ignoring empty camera frame.")
          # If loading a video, use 'break' instead of 'continue'.
          continue

        # To improve performance, optionally mark the image as not writeable to
        # pass by reference.
        image.flags.writeable = False
        image = cv2.cvtColor(image, cv2.COLOR_BGR2RGB)
        results = pose.process(image)

        # Draw the pose annotation on the image.
        image.flags.writeable = True
        image = cv2.cvtColor(image, cv2.COLOR_RGB2BGR)
        mp_drawing.draw_landmarks(
            image,
            results.pose_landmarks,
            mp_pose.POSE_CONNECTIONS,
            landmark_drawing_spec=mp_drawing_styles.get_default_pose_landmarks_style())
        # Flip the image horizontally for a selfie-view display.
        cv2.imshow('MediaPipe Pose', cv2.flip(image, 1))
        if cv2.waitKey(5) & 0xFF == 27:
          break
    cap.release()