博文主要介绍如何采用 Keras 和 Mask R-CNN 进行实例分割(有/无 GPU 环境).
[1] - CPU 环境,Mask R-CNN 不能实时运行;
[2] - GPU 环境,Mask R-CNN 可以达到 5-8 FPS.
Mask R-CNN 结构:
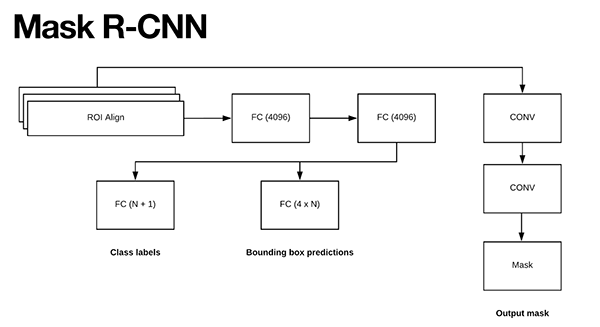
更多细节,可参考:
1. Keras Mask R-CNN 安装
必要库:
pip install numpy scipy
pip install pillow scikit-image matplotlib
pip install "IPython[all]"
pip install tensorflow # or tensorflow-gpu
pip install keras h5py

pip install opencv-contrib-python
Keras Mask R-CNN 安装:
git clone https://github.com/matterport/Mask_RCNN.git
cd Mask_RCNN
python setup.py install
测试安装:
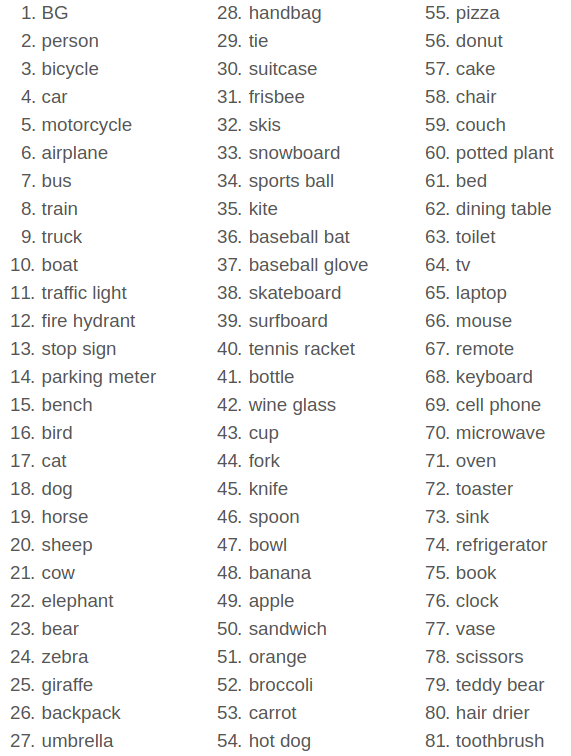
import mrcnn2. COCO 数据集标签
这里采用在 COCO 数据集上预训练的 Mask R-CNN 模型.
COCO 数据集的类别标签如下, - coco_labels.txt.
Dataset - COCO Dataset 数据特点 - AIUAI
3. Keras Mask R-CNN 预测
具体实现如下 - maskrcnn_predict.py:
#!/usr/bin/python3
#!--*-- coding:utf-8 --*--
from mrcnn.config import Config
from mrcnn import model as modellib
from mrcnn import visualize
import numpy as np
import colorsys
import argparse
import imutils
import random
import cv2
import os
#参数构建
ap = argparse.ArgumentParser()
ap.add_argument("-w", "--weights", required=True,
help="path to Mask R-CNN model weights pre-trained on COCO")
ap.add_argument("-l", "--labels", required=True,
help="path to class labels file")
ap.add_argument("-i", "--image", required=True,
help="path to input image to apply Mask R-CNN to")
args = vars(ap.parse_args())
#加载 COCO 类别标签,文件每一行为一个标签
CLASS_NAMES = open(args["labels"]).read().strip().split("\n")
#随机生成用于可视化类别标签的颜色集合
# (thanks to Matterport Mask R-CNN for the method!)
hsv = [(i / len(CLASS_NAMES), 1, 1.0) for i in range(len(CLASS_NAMES))]
COLORS = list(map(lambda c: colorsys.hsv_to_rgb(*c), hsv))
random.seed(42)
random.shuffle(COLORS)
class SimpleConfig(Config):
# give the configuration a recognizable name
NAME = "coco_inference"
#设定 GPUs 数量及每张 GPU 的图片数
GPU_COUNT = 1
IMAGES_PER_GPU = 1
#类别标签总数( background 已经被包含在内)
NUM_CLASSES = len(CLASS_NAMES)
#初始化配置参数
config = SimpleConfig()
#初始化 Mask R-CNn 模型用于推断,并加载权重.
print("[INFO] loading Mask R-CNN model...")
model = modellib.MaskRCNN(mode="inference",
config=config,
model_dir=os.getcwd())
model.load_weights(args["weights"], by_name=True)
#加载输入图像,并由 BGR 转到 RGB 格式,并 resize
image = cv2.imread(args["image"])
image = cv2.cvtColor(image, cv2.COLOR_BGR2RGB)
image = imutils.resize(image, width=512)
#单次网络 forward 计算,得到检测结果.
print("[INFO] making predictions with Mask R-CNN...")
r = model.detect([image], verbose=1)[0]
# loop over of the detected object's bounding boxes and masks
for i in range(0, r["rois"].shape[0]):
#提取单个检测结果的 class ID 及 mask
#提取用于可视化 mask 的颜色(BGR 格式)
classID = r["class_ids"][i]
mask = r["masks"][:, :, i]
color = COLORS[classID][::-1]
#可视化目标的像素级mask
image = visualize.apply_mask(image, mask, color, alpha=0.5)
#图像格式由 RGB 转换回 BGR 格式.
image = cv2.cvtColor(image, cv2.COLOR_RGB2BGR)
# loop over the predicted scores and class labels
for i in range(0, len(r["scores"])):
#提取边界框信息、class ID、类别标签、预测概率及可视化颜色
(startY, startX, endY, endX) = r["rois"][i]
classID = r["class_ids"][i]
label = CLASS_NAMES[classID]
score = r["scores"][i]
color = [int(c) for c in np.array(COLORS[classID]) * 255]
# draw the bounding box, class label, and score of the object
cv2.rectangle(image, (startX, startY), (endX, endY), color, 2)
text = "{}: {:.3f}".format(label, score)
y = startY - 10 if startY - 10 > 10 else startY + 10
cv2.putText(image, text, (startX, y), cv2.FONT_HERSHEY_SIMPLEX,
0.6, color, 2)
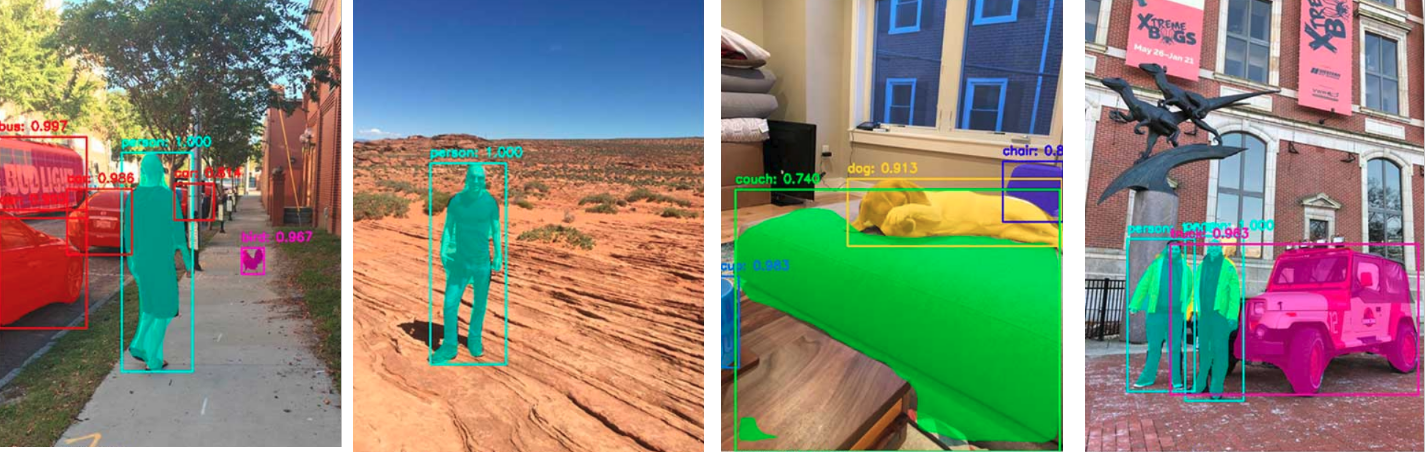
# show the output image
cv2.imshow("Output", image)
cv2.waitKey()运行,如:
python maskrcnn_predict.py \
    --weights mask_rcnn_coco.h5 \
    --labels coco_labels.txt \
    --image images/30th_birthday.jpg
输出结果如,