博文主要介绍如何基于深度学习、OpenCV 和 Python 实现图片和视频流的 YOLO 目标检测.
博文主要包括:
[1] - YOLO 目标检测模型及网络结构;
[2] - 采用 YOLO 检测图片中的目标;
[3] - 采用 YOLO 检测视频流中的目标;
[4] - 讨论 YOLO 目标检测模型的一些局限和不足.
1. 目标检测器简述
基于深度学习的目标检测模型,主要有:
[1] - R-CNN 及其变形,包括 R-CNN,Fast R-CNN 和 Faster R-CNN 等;
[2] - SSDs(Single Shot Detector)
[3] - YOLO
R-CNNs 是最早的基于深度学习的目标检测器,其是two-stage 的目标检测器.
[1] - 论文 R-CNN , Rich feature hierarchies for accurate object detection and semantic segmentation, (2013) 中,Grishick 等提出了一种需要基于 Selective Search 选取包含目标物体的候选边界框的目标检测算法.
[2] - SS 选取的区域,被送入 CNN 网络进行分类. 这就构成了最早的基于深度学习的目标检测器.
标准 R-CNN 方法的问题在于,其速度比较慢,且不是完全 end-to-end 的目标检测器.
Girshick 等人在 2015 年提出了第二篇目标检测论文 Fast R-CNN. Fast R-CNN 算法相比于标准的 R-CNN 算法进行了相当大的提升. 即:通过只进行单次 forward 计算,增加了检测准确度,并减少了计算时间. 然而,Fast R-CNN 仍依赖于额外的区域候选框生成(region proposal)算法.
直到 2015 年 Grishick 等人的 Faster R-CNN: Towards Real-Time Object Detection with Region Proposal Networks 论文,R-CNNs 才真正成为 end-to-end 的深度学习目标检测器,其移除了 Selective Search,而是采用了 RPN 网络(Region Proposal Network). RPN 网络的特点在于:(1)-全卷积网络;(2)-预测目标边界框和目标置信度(“objectness” socres,如,score 表示图片的一个区域是否包含一个目标的概率). RPNs 的输出再送入 R-CNN 网络进行最终的分类和检测.
虽然 R-CNNs 往往是很准确的,但 R-CNN 类的网络最大的问题是速度,通常是比较慢的,比如在 GPU 上只有 5 FPS.
为了提升基于深度学习目标检测器的检测速度,SSDs 和 YOLO 均采用了 one-stage 检测策略.
SSDs 和 YOLO 将目标检测问题看作回归问题,对于给定的输入图片,同时学习边界框坐标以及对应的目标类别的概率.
通常情况下,single-stage 目标检测器的精度不如 two-stage 的,但速度占优.
YOLO 是 single-stage 目标检测器的重要一种,其由 Redmon 等人在论文 You Only Look Once: Unified, Real-Time Object Detection (2015) 中提出的,其实现了在单 GPU 上 45 FPS 的实时目标检测.
注:YOLO 的一种更小的变形——Fast YOLO 号称可以在单 GPU 上实现 155 FPS 的速度.
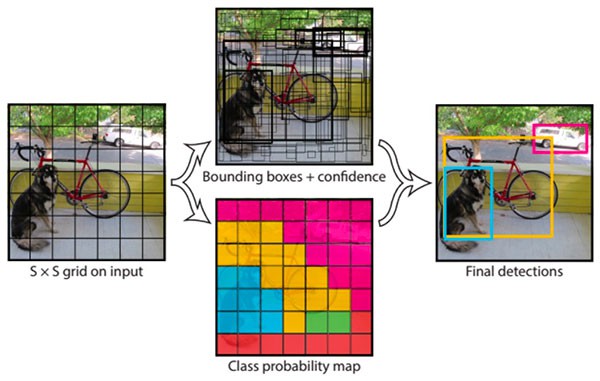
图 - YOLO 目标检测器流程简单例示.
YOLO 已经有很多更新迭代,比如 YOLO9000: Better, Faster, Stronger (如, YOLOv2) 能够检测超过 9000 种目标类别. Redmon 和 Farhadi 通过同时目标检测和目标分类的联合训练,实现了较大规模的目标检测. 采用联合训练的 YOLO9000 模型是同时基于 ImageNet 分类数据集和 COCO 检测数据集进行训练的. YOLO9000 模型可以预测没有被标注过的目标类别.
对于 COCO 的 156 个目标类的检测结果,YOLO9000 得到了 16% 的 mAP(mean Average Precision). 虽然 YOLO9000 能够检测 9000 种独立的目标类别,但精度却达不到需求.
Redmon 和 Farhadi 在论文 YOLOv3: An Incremental Improvement (2018) 中提出了一种新的 YOLO 模型. YOLOv3 模型大小明显增加,但是其仍可以认为是 YOLO 系列目标检测器的最好的一个.
这里采用 YOLOv3,具体的是,在 COCO 数据集上训练的 YOLO 模型.
COCO 数据集包含 80 种不同的类别标签,例如:
- People
- Bicycles
- Cars and trucks
- Airplanes
- Stop signs and fire hydrants
- Animals, including cats, dogs, birds, horses, cows, and sheep, to name a few
- Kitchen and dining objects, such as wine glasses, cups, forks, knives, spoons, etc.
Dataset - COCO Dataset 数据特点 - AIUAI
2. YOLO 图片目标检测
具体实现如下 - yolo.py:
#!/usr/bin/python3
#!--*-- coding:utf-8 --*--
import numpy as np
import argparse
import time
import cv2
import os
#输入参数
ap = argparse.ArgumentParser()
ap.add_argument("-i", "--image", required=True,
help="path to input image") # 待测试图片路径
ap.add_argument("-y", "--yolo", required=True,
help="base path to YOLO directory")
ap.add_argument("-c", "--confidence", type=float, default=0.5,
help="minimum probability to filter weak detections")
ap.add_argument("-t", "--threshold", type=float, default=0.3,
help="threshold when applyong non-maxima suppression") # nms 阈值
args = vars(ap.parse_args())
#加载 COCO 数据集类别名
labelsPath = os.path.sep.join([args["yolo"], "coco.names"])
LABELS = open(labelsPath).read().strip().split("\n")
#随机初始化颜色列表,用于表示每个类别.
np.random.seed(42)
COLORS = np.random.randint(0, 255, size=(len(LABELS), 3),
dtype="uint8")
#YOLO 权重文件及模型配置文件
weightsPath = os.path.sep.join([args["yolo"], "yolov3.weights"])
configPath = os.path.sep.join([args["yolo"], "yolov3.cfg"])
#采用 OpenCV DNN 模块加载YOLO目标检测模型 (80 classes)
print("[INFO] loading YOLO from disk...")
net = cv2.dnn.readNetFromDarknet(configPath, weightsPath)
#读取输入图片
image = cv2.imread(args["image"])
(H, W) = image.shape[:2]
#获取YOLO网络的输出层名
ln = net.getLayerNames()
ln = [ln[i[0] - 1] for i in net.getUnconnectedOutLayers()]
#构建网络输入图片 blob
blob = cv2.dnn.blobFromImage(image, 1 / 255.0, (416, 416),
swapRB=True, crop=False)
net.setInput(blob)
start = time.time()
#YOLO forward 计算,输出边界框及对应的置信度
layerOutputs = net.forward(ln)
end = time.time()
print("[INFO] YOLO took {:.6f} seconds".format(end - start))
# 分别得到检测的边界框、置信度及类别 IDs 结果
boxes = []
confidences = []
classIDs = []
# loop over each of the layer outputs
for output in layerOutputs:
# loop over each of the detections
for detection in output:
# extract the class ID and confidence (i.e., probability) of
# the current object detection
scores = detection[5:]
classID = np.argmax(scores)
confidence = scores[classID]
# filter out weak predictions by ensuring the detected
# probability is greater than the minimum probability
if confidence > args["confidence"]:
#将检测的边界框坐标缩放回相对图片尺寸的形式.
#因为YOLO 实际返回的结果是边界框的中心(x,y) 坐标、边界框的width 和 height.
box = detection[0:4] * np.array([W, H, W, H])
(centerX, centerY, width, height) = box.astype("int")
#计算边界框的左上角位置坐标
x = int(centerX - (width / 2))
y = int(centerY - (height / 2))
# update our list of bounding box coordinates, confidences,
# and class IDs
#
boxes.append([x, y, int(width), int(height)])
confidences.append(float(confidence))
classIDs.append(classID)
#NMS处理
idxs = cv2.dnn.NMSBoxes(boxes, confidences,
args["confidence"], args["threshold"])
#保证至少有一个检测框结果
if len(idxs) > 0:
# loop over the indexes we are keeping
for i in idxs.flatten():
# extract the bounding box coordinates
(x, y) = (boxes[i][0], boxes[i][1])
(w, h) = (boxes[i][2], boxes[i][3])
# draw a bounding box rectangle and label on the image
color = [int(c) for c in COLORS[classIDs[i]]]
cv2.rectangle(image, (x, y), (x + w, y + h), color, 2)
text = "{}: {:.4f}".format(LABELS[classIDs[i]], confidences[i])
cv2.putText(image, text, (x, y - 5), cv2.FONT_HERSHEY_SIMPLEX,
0.5, color, 2)
#显示输出图像
cv2.imshow("Image", image)
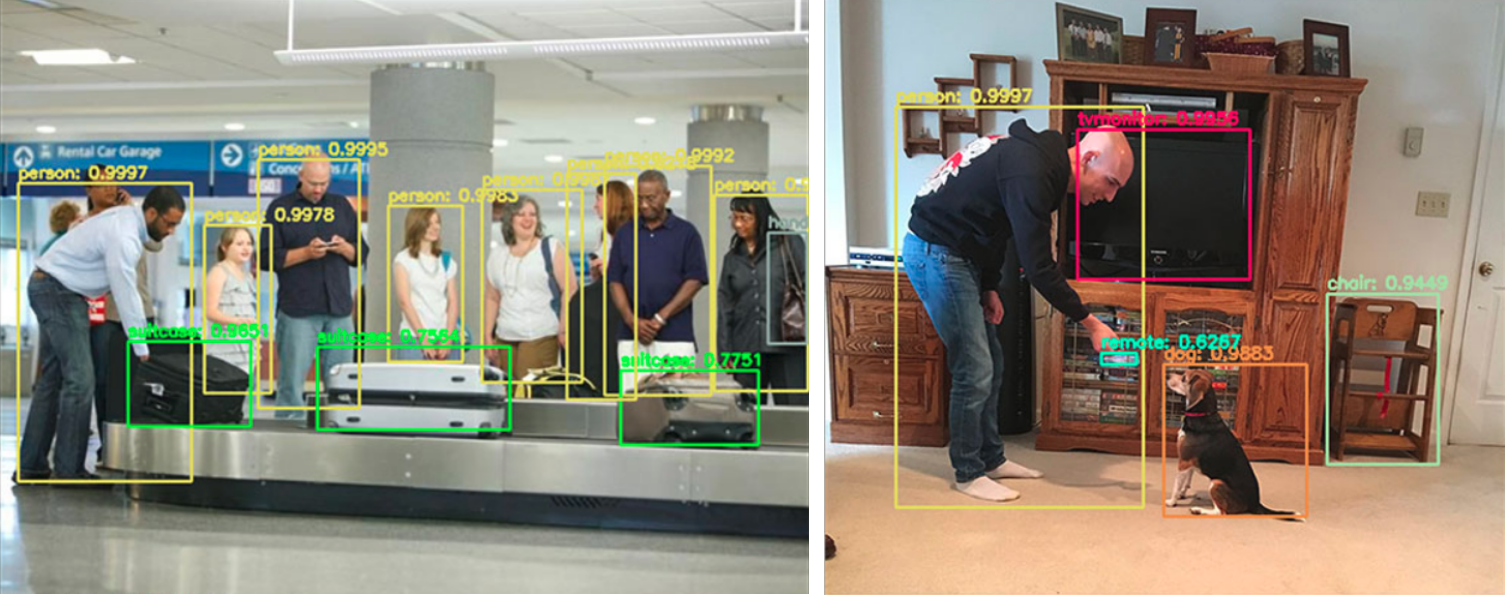
cv2.waitKey(0)运行,如:
python yolo.py --image images/baggage_claim.jpg --yolo yolo-coco输出如:
3. YOLO 视频流目标检测
具体实现如下 - yolo_video.py:
#!/usr/bin/python3
#!--*-- coding:utf-8 --*--
import numpy as np
import argparse
import imutils
import time
import cv2
import os

#输入参数
ap = argparse.ArgumentParser()
ap.add_argument("-i", "--input", required=True,
    help="path to input video")
ap.add_argument("-o", "--output", required=True,
    help="path to output video")
ap.add_argument("-y", "--yolo", required=True,
    help="base path to YOLO directory")
ap.add_argument("-c", "--confidence", type=float, default=0.5,
    help="minimum probability to filter weak detections")
ap.add_argument("-t", "--threshold", type=float, default=0.3,
    help="threshold when applyong non-maxima suppression")
args = vars(ap.parse_args())

#
labelsPath = os.path.sep.join([args["yolo"], "coco.names"])
LABELS = open(labelsPath).read().strip().split("\n")

#
np.random.seed(42)
COLORS = np.random.randint(0, 255, size=(len(LABELS), 3),
    dtype="uint8")

#
weightsPath = os.path.sep.join([args["yolo"], "yolov3.weights"])
configPath = os.path.sep.join([args["yolo"], "yolov3.cfg"])

#
print("[INFO] loading YOLO from disk...")
net = cv2.dnn.readNetFromDarknet(configPath, weightsPath)
ln = net.getLayerNames()
ln = [ln[i[0] - 1] for i in net.getUnconnectedOutLayers()]

#
vs = cv2.VideoCapture(args["input"])
writer = None
(W, H) = (None, None)

#计算视频文件的总帧数
try:
    prop = cv2.cv.CV_CAP_PROP_FRAME_COUNT if imutils.is_cv2() \
        else cv2.CAP_PROP_FRAME_COUNT
    total = int(vs.get(prop))
    print("[INFO] {} total frames in video".format(total))

except:
    print("[INFO] could not determine # of frames in video")
    print("[INFO] no approx. completion time can be provided")
    total = -1

#逐帧处理
while True:
    #读取视频文件的下一帧
    (grabbed, frame) = vs.read()

    if not grabbed:
        break

    #
    if W is None or H is None:
        (H, W) = frame.shape[:2]

    #类似于图片目标检测
    blob = cv2.dnn.blobFromImage(frame, 1 / 255.0, (416, 416),
        swapRB=True, crop=False)
    net.setInput(blob)
    start = time.time()
    layerOutputs = net.forward(ln)
    end = time.time()

    #
    boxes = []
    confidences = []
    classIDs = []

    #
    for output in layerOutputs:
        for detection in output:
            scores = detection[5:]
            classID = np.argmax(scores)
            confidence = scores[classID]

            if confidence > args["confidence"]:
                box = detection[0:4] * np.array([W, H, W, H])
                (centerX, centerY, width, height) = box.astype("int")

                x = int(centerX - (width / 2))
                y = int(centerY - (height / 2))

                boxes.append([x, y, int(width), int(height)])
                confidences.append(float(confidence))
                classIDs.append(classID)

    #
    idxs = cv2.dnn.NMSBoxes(boxes, confidences, args["confidence"],
        args["threshold"])

    #
    if len(idxs) > 0:
        for i in idxs.flatten():
            (x, y) = (boxes[i][0], boxes[i][1])
            (w, h) = (boxes[i][2], boxes[i][3])

            color = [int(c) for c in COLORS[classIDs[i]]]
            cv2.rectangle(frame, (x, y), (x + w, y + h), color, 2)
            text = "{}: {:.4f}".format(LABELS[classIDs[i]],
                confidences[i])
            cv2.putText(frame, text, (x, y - 5),
                cv2.FONT_HERSHEY_SIMPLEX, 0.5, color, 2)

    #检测结果写入输出视频文件
    if writer is None:
        # initialize our video writer
        fourcc = cv2.VideoWriter_fourcc(*"MJPG")
        writer = cv2.VideoWriter(args["output"], fourcc, 30,
            (frame.shape[1], frame.shape[0]), True)

        # some information on processing single frame
        if total > 0:
            elap = (end - start)
            print("[INFO] single frame took {:.4f} seconds".format(elap))
            print("[INFO] estimated total time to finish: {:.4f}".format(
                elap * total))

    # write the output frame to disk
    writer.write(frame)

# release the file pointers
print("[INFO] cleaning up...")
writer.release()
vs.release()
运行,如:
python yolo_video.py --input videos/car_chase_01.mp4 \
                     --output output/car_chase_01.avi \
                     --yolo yolo-coco
输出,如:


4. YOLO 的局限与不足讨论
YOLO 目标检测器最大的局限与不足在于:
[1] - YOLO 对于小目标处理效果往往不够好.
[2] - YOLO 对于密集目标(grouped close together)的检测特别不好.
分析其原因,
[1] - YOLO 目标检测器是将输入图像划分为 SxS 个网格,每个单元网格只预测单个目标.
[2] - 如果在单个单元格中,存在多个目标、小目标,YOLO 将难以进行检测,最终导致错误检测.
因此,如果特定场景数据集中包含很多小目标物体、密集在一起的目标物体,可能就不推荐 YOLO 目标检测器.
对于小目标检测,Faster R-CNN 往往检测效果最好,但速度最慢.
SSDs 也可以用于小目标检测,但是 SSDs 也会比较棘手于处理更小的目标(但是没有 YOLO 那么显著). SSDs 保持了速度和精度的很好的平衡.
需要注意的是,在这篇博文里 YOLO 的运行速度是比 SSD 慢的. 在博文 Object detection with deep learning and OpenCV - 2017.09.11 中采用 SSD 进行检测,单次 forward 计算 耗时约 0.03 秒. 而在这篇博文里,YOLO 的单次 forward 计算耗时约 0.3 秒,几乎慢了一个数量级.
如果要采用预训练好的深度学习目标检测器,OpenCV 更多的建议采用 SSDs,然后才是 YOLO. 从这篇博文作者的经验来看,几乎很少遇到要采用 YOLO 超过 SSDs 的场景,原因在于:
[1] - SSDs 更易于训练;且精度往往都超过 YOLO(至少对于博文作者所采用过的数据集).
[2] - YOLO 可能在 COCO 数据集上效果更优;但是博文作者在自己的任务场景中暂时没取得类似的精度.
因此,在给定问题的目标检测问题中,
[1] - 如果需要检测小目标,又不在乎速度,则倾向于使用 Faster R-CNN.
[2] - 如果速度是最重要的,使用 YOLO.
[3] - 如果是其它的,倾向于使用 SSDs.
博文作者在大部分场景都是采用 SSDs 或 RetinaNet,二者都在 YOLO 和 Faster R-CNN 之间取得了很好的均衡.