原文:TensorFlow - 使用FGSM的对抗示例
该文介绍使用Goodfellow 等人 Explaining and Harnessing Adversarial Examples - 2014 (解释和利用对抗示例)的描述,使用快速梯度签名方法(Fast Gradient Sign Attack, FGSM) 攻击创建了对抗示例 . 这是愚弄神经网络的第一种也是最受欢迎的攻击之一.
1. 什么是对抗性例子
对抗性示例是专门创建的输入,其目的是混淆神经网络,从而导致给定输入的分类错误. 这些臭名昭著的输入对于人眼是无法区分的,但是会导致网络无法识别图像的内容. 这类攻击有几种类型,但是,这里的重点是快速梯度符号方法攻击,这是一种白盒攻击,其目的是确保错误分类. 白盒攻击是攻击者可以完全访问被攻击模型的地方.
下面显示的对抗图像的最著名示例之一取自上述论文.
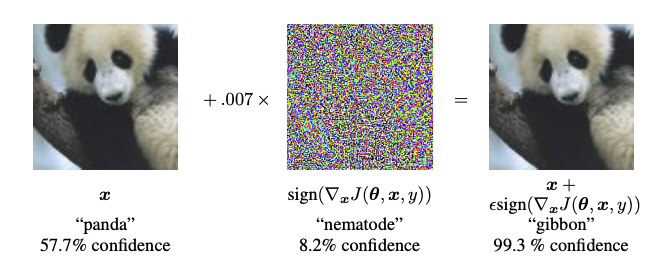
这里,熊猫图像,攻击者向原始图像添加了较小的扰动(失真),这导致模型以较高的置信度将该图像标记为长臂猿. 下面说明添加这些扰动的过程.
2. 快速梯度符号法
快速梯度符号方法通过使用神经网络的梯度来创建对抗性示例.
对于输入图像,该方法使用损失相对于输入图像的梯度来创建使损失最大化的新图像. 该新图像称为对抗图像. 可以使用以下表达式进行总结:
$$ adv\_x = x + \epsilon * \text{sign} (\nabla _{x} J(\theta, x, y)) $$
其中,
$adv\_x$ - 对抗图像;$x$ - 原始输入图像;$y$ - 原始输入标签;$\epsilon$ - 乘数以确保扰动很小;$\theta$ - 模型参数;$J$ - 亏损.
在此,一个有趣的特性是相对于输入图像采用了渐变. 这样做是因为目标是创建使损失最大化的图像. 一种实现此目的的方法是找出图像中每个像素对损耗值的贡献程度,并相应地增加一个扰动. 这非常有效,因为通过使用链式规则并找到所需的渐变,很容易找到每个输入像素对损耗的贡献. 因此,相对于图像采取梯度. 另外,由于不再对模型进行训练(因此,相对于可训练变量(即模型参数)不采用梯度),因此模型参数保持恒定. 唯一的目标是欺骗已经受过训练的模型.
因此,尝试愚弄一个预训练的模型. 这里采用的模型是在ImageNet上预训练的 MobileNetV2模型.
3. 配置
import tensorflow as tf
import matplotlib as mpl
import matplotlib.pyplot as plt

mpl.rcParams['figure.figsize'] = (8, 8)
mpl.rcParams['axes.grid'] = False

# 加载模型
pretrained_model = tf.keras.applications.MobileNetV2(include_top=True, weights='imagenet')
pretrained_model.trainable = False

# ImageNet labels
decode_predictions = tf.keras.applications.mobilenet_v2.decode_predictions

#
# Helper function to preprocess the image so that it can be inputted in MobileNetV2
def preprocess(image):
  image = tf.cast(image, tf.float32)
  image = tf.image.resize(image, (224, 224))
  image = tf.keras.applications.mobilenet_v2.preprocess_input(image)
  image = image[None, ...]
  return image

# Helper function to extract labels from probability vector
def get_imagenet_label(probs):
  return decode_predictions(probs, top=1)[0][0]
4. 原始图片
使用来自Wikimedia Common的Mirko CC-BY-SA 3.0的拉布拉多犬的样本图像,并从中创建对抗性示例.
第一步是对其进行预处理,以便可以将其作为MobileNetV2模型的输入.
image_path = tf.keras.utils.get_file('YellowLabradorLooking_new.jpg', 'https://storage.googleapis.com/download.tensorflow.org/example_images/YellowLabradorLooking_new.jpg')
image_raw = tf.io.read_file(image_path)
image = tf.image.decode_image(image_raw)

image = preprocess(image)
image_probs = pretrained_model.predict(image)

#
plt.figure()
plt.imshow(image[0]*0.5+0.5) # To change [-1, 1] to [0,1]
_, image_class, class_confidence = get_imagenet_label(image_probs)
plt.title('{} : {:.2f}% Confidence'.format(image_class, class_confidence*100))
plt.show()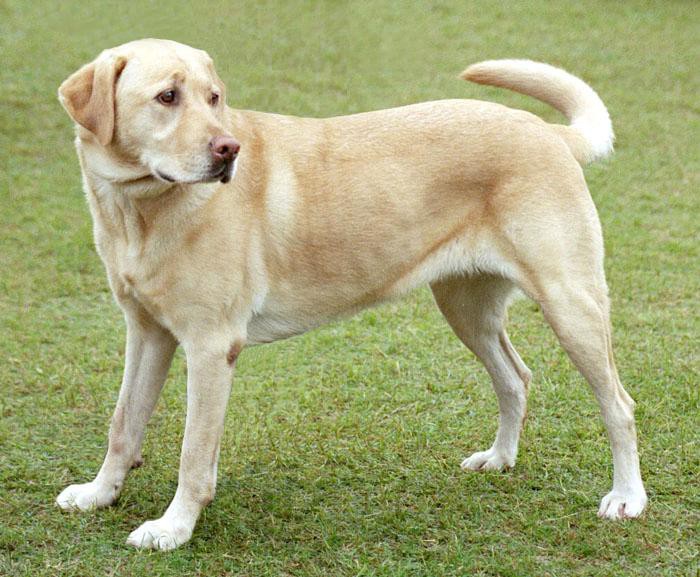
5. 创建对抗形象
5.1. 实现快速梯度符号法
第一步是创建扰动,该扰动将用于使原始图像失真,从而产生对抗图像. 如上所述,对于该任务,相对于图像采取梯度.
loss_object = tf.keras.losses.CategoricalCrossentropy()

def create_adversarial_pattern(input_image, input_label):
  with tf.GradientTape() as tape:
    tape.watch(input_image)
    prediction = pretrained_model(input_image)
    loss = loss_object(input_label, prediction)

  # Get the gradients of the loss w.r.t to the input image.
  gradient = tape.gradient(loss, input_image)
  # Get the sign of the gradients to create the perturbation
  signed_grad = tf.sign(gradient)
  return signed_grad
可视化由此产生的扰动:
# Get the input label of the image.
labrador_retriever_index = 208
label = tf.one_hot(labrador_retriever_index, image_probs.shape[-1])
label = tf.reshape(label, (1, image_probs.shape[-1]))

perturbations = create_adversarial_pattern(image, label)
plt.imshow(perturbations[0]*0.5+0.5); # To change [-1, 1] to [0,1]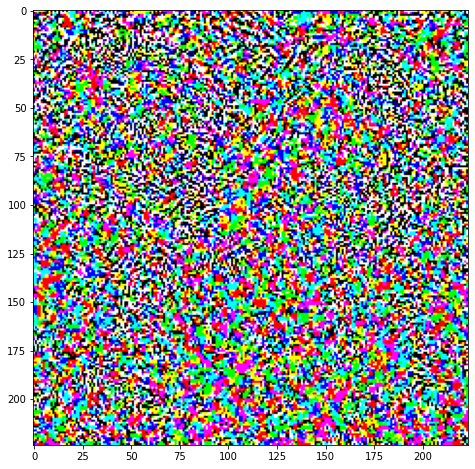
尝试一下不同的epsilon值,并观察结果图像. 会注意到,随着epsilon值的增加,欺骗网络变得更加容易. 但是,这是折衷方案,导致扰动变得更加可识别.
def display_images(image, description):
  _, label, confidence = get_imagenet_label(pretrained_model.predict(image))
  plt.figure()
  plt.imshow(image[0]*0.5+0.5)
  plt.title('{} \n {} : {:.2f}% Confidence'.format(description,label, confidence*100))
  plt.show()

#
epsilons = [0, 0.01, 0.1, 0.15]
descriptions = [('Epsilon = {:0.3f}'.format(eps) if eps else 'Input')
                for eps in epsilons]

for i, eps in enumerate(epsilons):
  adv_x = image + eps*perturbations
  adv_x = tf.clip_by_value(adv_x, -1, 1)
  display_images(adv_x, descriptions[i])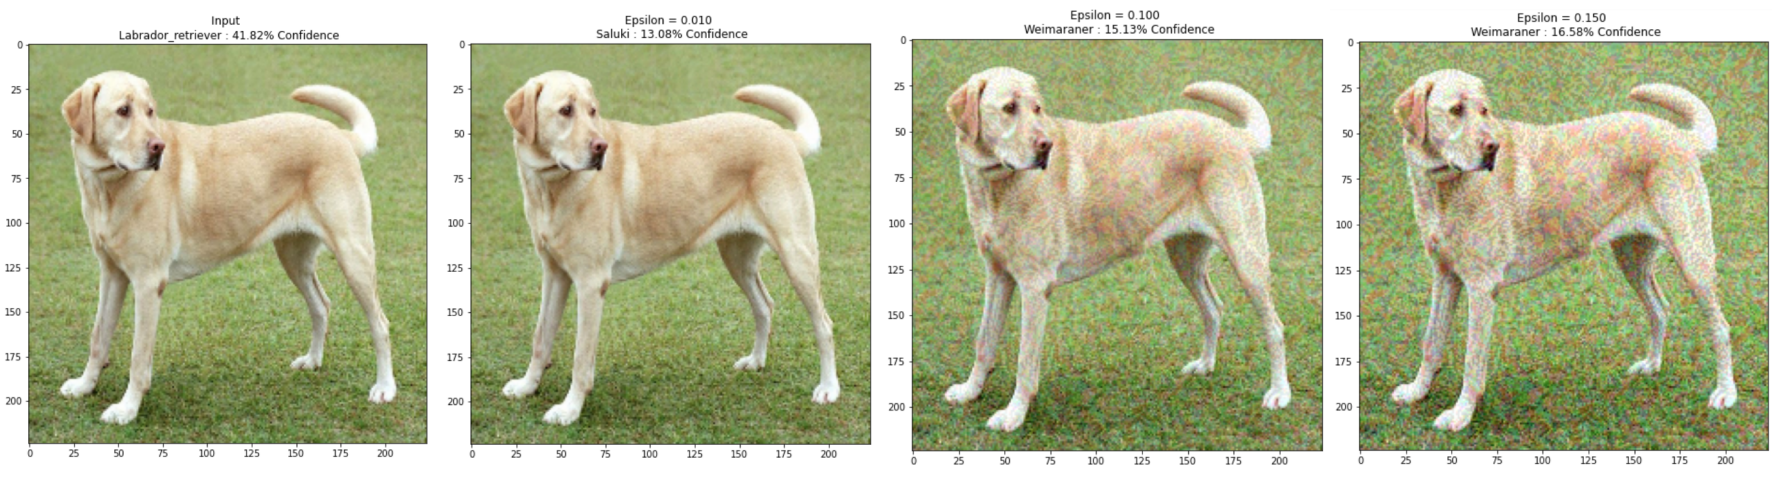
6. 下一步
已经了解了对抗性攻击,可以不同的数据集和不同的体系结构上进行尝试.
也可以创建和训练自己的模型,然后尝试使用相同的方法来使其愚弄.
还可以尝试查看更改epsilon时对预测的信心如何变化.
尽管功能强大,该文中的攻击只是对抗性攻击研究的开端,此后已有多篇论文创建了更强大的攻击. 除了对抗性攻击之外,研究还导致了防御的创建,其目的是创建强大的机器学习模型. 可以查看论文 Adversarial Attacks and Defences: A Survey - 2018 ,以获取对抗性攻击和防御的完整列表.
有关对抗性攻击和防御的更多实现,可能需要查看对抗性示例库CleverHans .