EfficientNet 是一种新的模型缩放方法,准确率比之前最好的Gpipe提高了0.1%,但是模型更小更快,参数的数量和FLOPS都大大减少,效率提升了10倍.
1. EfficientNet 简述
将 EfficientNet 划分为 base model 和 building block 两部分来分述. 众所周知的,经典 ResNet 模型的 building block 是恒等映射和卷积(identity and convolution block).
Efficient 的主要 building block 是 MBConv(mobile inverted bottleneck),其是在 MobileNetV2 中首先被提出的. 与展开的网络层相比,在 bottlenecks 间直接采用 shortcuts 连接的通道数量会少很对; 结合 depthwise separable convolution,相比较与传统网络层,能够有效的减少计算量,缩减因子几乎是 k^2. 其中,k 表示 kernel size,指定了 2D 卷积滑窗的 height 和 width.
By using shortcuts directly between the bottlenecks which connects a much fewer number of channels compared to expansion layers, combined with depthwise separable convolution which effectively reduces computation by almost a factor of k^2, compared to traditional layers. Where k stands for the kernel size, specifying the height and width of the 2D convolution window.
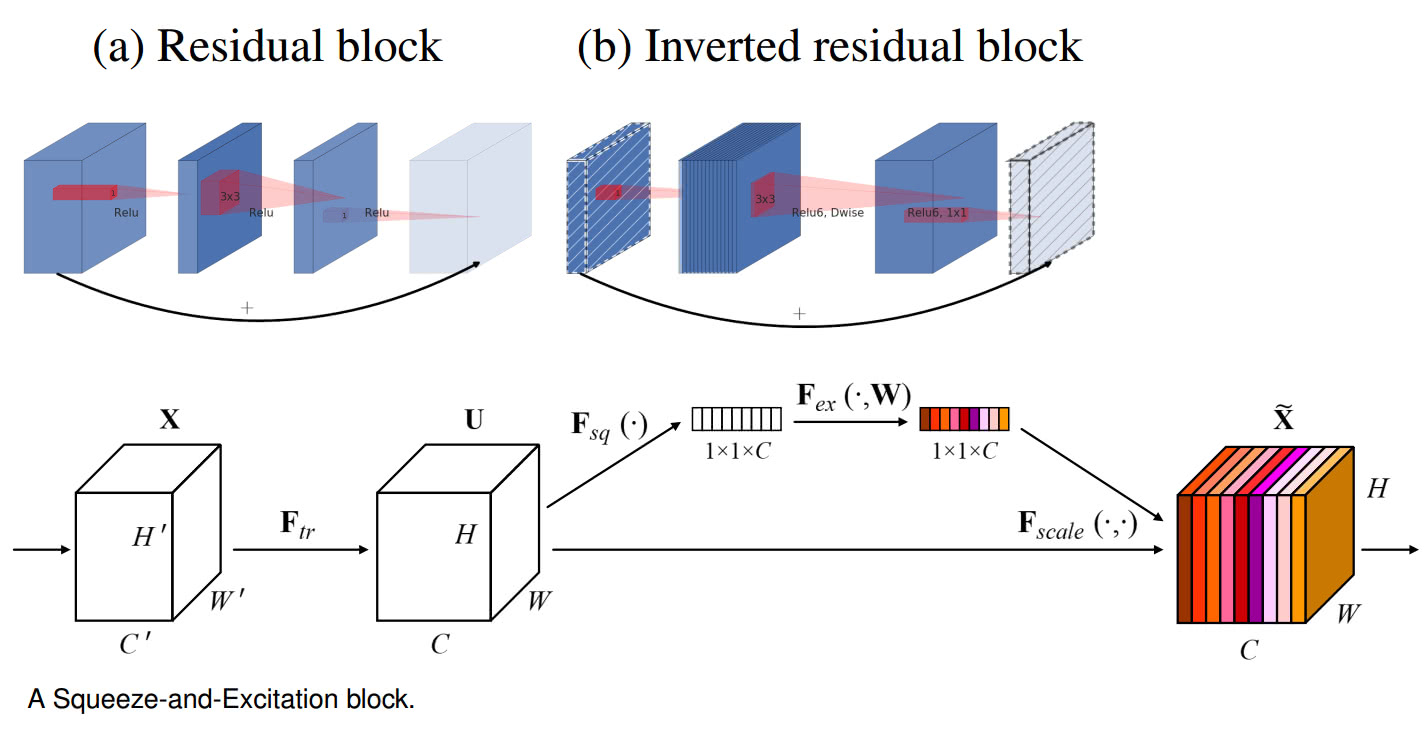
EfficientNet 还增加了 squeeze-and-excitation(SE) optimization,其有助于进一步提升性能.
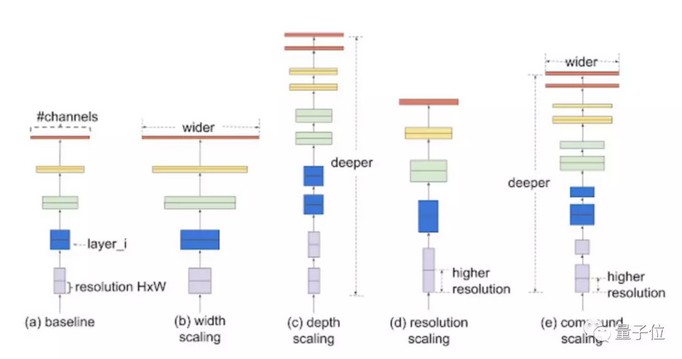
另外,EfficientNet 的另一个优势在于,通过仔细的平衡网络深度(depth)、宽度(width) 和分辨率(resolution),以便更有效的扩展,获得更好的性能.
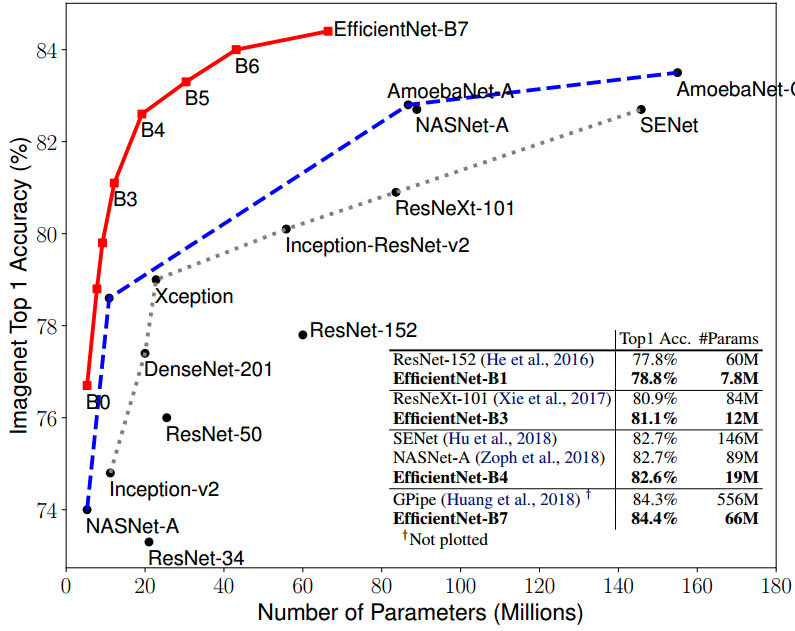
如图,从最小的 EfficientNet B0 到最大的 B7,精度在稳步增加,同时模型参数保持相对小的大小.
相比于 ImageNet 同样精度的其它模型,EfficientNet 参数量少很多. 例如,ResNet50 模型在 Keras 实现中参数量共 23534592,即使其精度不如最小的 EfficientNet B0,B0 的参数两仅有 5330564.
2. PyTorch - EfficientNet
Github - lukemelas/EfficientNet-PyTorch
2.1. 安装
Pip 安装:
pip install efficientnet_pytorch或源码安装:
git clone lukemelas/EfficientNet-PyTorch
cd EfficientNet-Pytorch
pip install -e .
2.2. 加载
EfficientNet 的加载:
from efficientnet_pytorch import EfficientNet

# 加载网络结构,无预训练权重参数
model = EfficientNet.from_name('efficientnet-b0')
print(model)

# 加载网络结构,带预训练权重参数
model = EfficientNet.from_pretrained('efficientnet-b0')
print(model)
提供的预训练权重的精度:
| Name | # Params | Top-1 Acc. | Pretrained? |
|---|---|---|---|
efficientnet-b0 | 5.3M | 76.3 | ✓ |
efficientnet-b1 | 7.8M | 78.8 | ✓ |
efficientnet-b2 | 9.2M | 79.8 | ✓ |
efficientnet-b3 | 12M | 81.1 | ✓ |
efficientnet-b4 | 19M | 82.6 | ✓ |
efficientnet-b5 | 30M | 83.3 | ✓ |
efficientnet-b6 | 43M | 84.0 | ✓ |
efficientnet-b7 | 66M | 84.4 | ✓ |
2.3. 修改输出层
修改网络输出层:
原:
  (_conv_head): Conv2dStaticSamePadding(
    320, 1280, kernel_size=(1, 1), stride=(1, 1), bias=False
    (static_padding): Identity()
  )
  (_bn1): BatchNorm2d(1280, eps=0.001, momentum=0.010000000000000009, affine=True, track_running_stats=True)
  (_avg_pooling): AdaptiveAvgPool2d(output_size=1)
  (_dropout): Dropout(p=0.2, inplace=False)
  (_fc): Linear(in_features=1280, out_features=1000, bias=True)
  (_swish): MemoryEfficientSwish()
)
修改:
from torch import nn
from efficientnet_pytorch import EfficientNet

model = EfficientNet.from_pretrained('efficientnet-b0')
in_features = model._fc.in_features
#或
# model._fc.out_features = 20
model._fc = nn.Linear(in_features=in_features, out_features=20, bias=True)
print(model)
修改后:
  (_conv_head): Conv2dStaticSamePadding(
    320, 1280, kernel_size=(1, 1), stride=(1, 1), bias=False
    (static_padding): Identity()
  )
  (_bn1): BatchNorm2d(1280, eps=0.001, momentum=0.010000000000000009, affine=True, track_running_stats=True)
  (_avg_pooling): AdaptiveAvgPool2d(output_size=1)
  (_dropout): Dropout(p=0.2, inplace=False)
  (_fc): Linear(in_features=1280, out_features=20, bias=True)
  (_swish): MemoryEfficientSwish()
)
2.4. 预测
#!/usr/bin/python3
#!--*-- coding:utf-8 --*--
import json
from PIL import Image

import torch
from torchvision import transforms

from efficientnet_pytorch import EfficientNet
model = EfficientNet.from_pretrained('efficientnet-b0')

# 图片处理
tfms = transforms.Compose([transforms.Resize(224), transforms.ToTensor(),
    transforms.Normalize([0.485, 0.456, 0.406], [0.229, 0.224, 0.225]),])
#
img = tfms(Image.open('test.jpg')).unsqueeze(0)
print(img.shape)
# torch.Size([1, 3, 224, 224])

# 加载 ImageNet class names
labels_map = json.load(open('labels_map.txt'))
labels_map = [labels_map[str(i)] for i in range(1000)]

# 分类
model.eval()
with torch.no_grad():
    outputs = model(img)

# 预测结果
print('-----')
for idx in torch.topk(outputs, k=5).indices.squeeze(0).tolist():
    prob = torch.softmax(outputs, dim=1)[0, idx].item()
    print('{label:<75} ({p:.2f}%)'.format(label=labels_map[idx], p=prob*100))
2.5. 特征提取
from efficientnet_pytorch import EfficientNet
model = EfficientNet.from_pretrained('efficientnet-b0')

# 图片处理
tfms = transforms.Compose([transforms.Resize(224), transforms.ToTensor(),
    transforms.Normalize([0.485, 0.456, 0.406], [0.229, 0.224, 0.225]),])
#
img = tfms(Image.open('test.jpg')).unsqueeze(0)
print(img.shape)
# torch.Size([1, 3, 224, 224])

features = model.extract_features(img)
print(features.shape)
# torch.Size([1, 1280, 7, 7])
2.6. 微调
(multi-label 场景)
import sys
import time
from PIL import Image

import torchimport torch.nn as nn
import torch.optim as optim
from torch.utils import data
from torch.autograd import Variable

import torchvision
import torchvision.transforms as transforms

from efficientnet_pytorch import EfficientNet


# DataLoader
class Dataset(data.Dataset):
    def __init__(self,csv_path,images_path,transform=None):
        #Read The CSV and create the dataframe
        self.train_set=pd.read_csv(csv_path)

        self.train_path=images_path #Images Path
        self.transform=transform # Augmentation Transforms

    def __len__(self):
        return len(self.train_set)

    def __getitem__(self,idx):
        file_name=self.train_set.iloc[idx][0]+'.png'
        label=self.train_set.iloc[idx][1]
        img=Image.open(os.path.join(self.train_path,file_name)) #Loading Image
        if self.transform is not None:
            img=self.transform(img)
        return img,label

#
transform_train = transforms.Compose([
    transforms.Resize((224,224)),
    transforms.RandomApply([
        torchvision.transforms.RandomRotation(10),
        transforms.RandomHorizontalFlip()],
        0.7),
    transforms.ToTensor()])
#
training_set=Dataset('/path/to/train.csv', '/path/to/train_images/', transform=transform_train)

#
params = {'batch_size': 16, 'shuffle': True }
training_generator=data.DataLoader(training_set,**params)

#
use_cuda = torch.cuda.is_available()
device = torch.device("cuda:0" if use_cuda else "cpu")
print(device)

outputfolder='/path/to/train_outputs/'
if(not os.path.exists(outputfolder)):
    os.mkdir(outputfolder)

# Model
model = EfficientNet.from_pretrained('efficientnet-b0', num_classes=20)
model.to(device)
print(summary(model, input_size=(3, 512, 512)))

criterion = nn.CrossEntropyLoss()
learning_rate=1e-3
lr_decay=0.99
optimizer = optim.Adam(model.parameters(), lr=learning_rate)

# 模型训练
epochs = 100
history_accuracy=[]
history_loss=[]
for epoch in range(epochs):
    running_loss = 0.0
    correct=0
    total=0
    class_correct = list(0. for _ in classes)
    class_total = list(0. for _ in classes)
    for i, data in enumerate(training_generator, 0):
        inputs, labels = data
        t0 = time()
        inputs, labels = inputs.to(device), labels.to(device)

        optimizer.zero_grad()
        outputs = model(inputs)

        loss = criterion(outputs, torch.max(labels, 1)[1])
        _, predicted = torch.max(outputs, 1)
        _, labels = torch.max(labels, 1)

        c = (predicted == labels.data).squeeze()
        correct += (predicted == labels).sum().item()
        total += labels.size(0)
        accuracy = float(correct) / float(total)

        history_accuracy.append(accuracy)
        history_loss.append(loss)

        loss.backward()
        optimizer.step()

        for j in range(labels.size(0)):
            label = labels[j]
            class_correct[label] += c[j].item()
            class_total[label] += 1

        running_loss += loss.item()

        print( "Epoch : ",epoch+1," Batch : ", i+1," Loss :  ",running_loss/(i+1)," Accuracy : ",accuracy,"Time ",round(time()-t0, 2),"s" )
    for k in range(len(classes)):
        if(class_total[k]!=0):
            print('Accuracy of %5s : %2d %%' % (classes[k], 100 * class_correct[k] / class_total[k]))

    print('[%d epoch] Accuracy of the network on the Training images: %d %%' % (epoch+1, 100 * correct / total))

    if epoch%10==0 or epoch==0:
        torch.save(model.state_dict(), os.path.join(outputfolder,str(epoch+1)+'_'+str(round(accuracy, 4))+'.pth'))

# 模型保存
torch.save(model.state_dict(), os.path.join(outputfolder,'Last_epoch'+str(round(accuracy, 4))+'.pth'))

# 可视化训练曲线
plt.plot(history_accuracy)
plt.plot(history_loss)

# 模型预测
model.load_state_dict(torch.load(os.path.join(outputfolder, '/50_0.9246.pth')))
model.eval()

#
test_transforms = transforms.Compose([transforms.Resize(512),
                                      transforms.ToTensor(),
                                     ])
def predict_image(image):
    image_tensor = test_transforms(image)
    image_tensor = image_tensor.unsqueeze_(0)
    input = Variable(image_tensor)
    input = input.to(device)
    output = model(input)
    index = output.data.cpu().numpy().argmax()
    return index

#
img=Image.open('test.jpg')
prediction=predict_image(img)
3. Keras - EfficientNet
Github - qubvel/efficientnet
3.1. 安装
依赖项:
Keras >= 2.2.0/TensorFlow >= 1.12.0keras_applications >= 1.0.7scikit-image
Pip 安装:
# stable
pip install -U efficientnet

# latest - with keras and tf.keras support
pip install -U --pre efficientnet

# source
 pip install -U git+https://github.com/qubvel/efficientnet
3.2. 加载
模型初始化:
# models can be build with Keras or Tensorflow frameworks
# use keras and tfkeras modules respectively
# efficientnet.keras / efficientnet.tfkeras
import efficientnet.keras as efn

model = efn.EfficientNetB0(weights='imagenet')  # or weights='noisy-student'
加载预训练权重:
# model use some custom objects, so before loading saved model
# import module your network was build with
# e.g. import efficientnet.keras / import efficientnet.tfkeras
import efficientnet.tfkeras
from tensorflow.keras.models import load_model

model = load_model('path/to/model.h5')
提供的云训练权重参数的精度:
| Architecture | @top1* Imagenet | @top1* Noisy-Student |
|---|---|---|
| EfficientNetB0 | 0.772 | 0.788 |
| EfficientNetB1 | 0.791 | 0.815 |
| EfficientNetB2 | 0.802 | 0.824 |
| EfficientNetB3 | 0.816 | 0.841 |
| EfficientNetB4 | 0.830 | 0.853 |
| EfficientNetB5 | 0.837 | 0.861 |
| EfficientNetB6 | 0.841 | 0.864 |
| EfficientNetB7 | 0.844 | 0.869 |
3.3. 预测
import os
import sys
import numpy as np
from skimage.io import imread
import matplotlib.pyplot as plt

from keras.applications.imagenet_utils import decode_predictions

from efficientnet.keras import EfficientNetB0
from efficientnet.keras import center_crop_and_resize, preprocess_input

## 或使用 tensorflow.keras:
# from efficientnet.tfkeras import EfficientNetB0
# from efficientnet.tfkeras import center_crop_and_resize, preprocess_input

# 测试图片
image = imread('test.jpg')

# 加载预训练模型
model = EfficientNetB0(weights='imagenet')

# 输入处理
image_size = model.input_shape[1]
x = center_crop_and_resize(image, image_size=image_size)
x = preprocess_input(x)
x = np.expand_dims(x, 0)

# 预测及解码
y = model.predict(x)
decode_predictions(y)
3.4. 微调
#!/usr/bin/python3
#!--*-- coding: utf-8 --*--
from efficientnet.tfkeras import EfficientNetB0
from efficientnet.tfkeras import center_crop_and_resize, preprocess_input

from tensorflow.keras import models
from tensorflow.keras import layers
from tensorflow.keras.preprocessing.image import ImageDataGenerator
from tensorflow.keras.utils import plot_model

# 加载预训练模型,作为 conv base model
conv_base = EfficientNetB0(weights="imagenet", include_top=False, input_shape=input_shape)

# 构建微调模型
dropout_rate = 0.2
model = models.Sequential()
model.add(conv_base)
model.add(layers.GlobalMaxPooling2D(name="gap"))
# model.add(layers.Flatten(name="flatten"))
if dropout_rate > 0:
    model.add(layers.Dropout(dropout_rate, name="dropout_out"))
# model.add(layers.Dense(256, activation='relu', name="fc1"))
model.add(layers.Dense(20, activation="softmax", name="fc_out"))

# 冻结 conv_base 模型的卷积权重
conv_base.trainable = False
# 或
#conv_base.trainable = True
#set_trainable = False
#for layer in conv_base.layers:
#    if layer.name == 'multiply_16':
#        set_trainable = True
#    if set_trainable:
#        layer.trainable = True
#    else:
#        layer.trainable = False


# 训练数据处理
train_datagen = ImageDataGenerator(
    rescale=1.0 / 255,
    rotation_range=40,
    width_shift_range=0.2,
    height_shift_range=0.2,
    shear_range=0.2,
    zoom_range=0.2,
    horizontal_flip=True,
    fill_mode="nearest",
)

# 验证数据处理
test_datagen = ImageDataGenerator(rescale=1.0 / 255)

train_generator = train_datagen.flow_from_directory(
    train_dir,
    # All images will be resized to target height and width.
    target_size=(height, width),
    batch_size=batch_size,
    # Since we use categorical_crossentropy loss, we need categorical labels
    class_mode="categorical",
)

validation_generator = test_datagen.flow_from_directory(
    validation_dir,
    target_size=(height, width),
    batch_size=batch_size,
    class_mode="categorical",
)

#
model.compile(
    loss="categorical_crossentropy",
    optimizer=optimizers.RMSprop(lr=2e-5),
    metrics=["acc"],
)
history = model.fit_generator(
    train_generator,
    steps_per_epoch=NUM_TRAIN // batch_size,
    epochs=epochs,
    validation_data=validation_generator,
    validation_steps=NUM_TEST // batch_size,
    verbose=1,
    use_multiprocessing=True,
    workers=4,
)

#
plot_model(conv_base, to_file='conv_base.png', show_shapes=True)
4. 参考
[1] - pytorch笔记:Efficientnet微调 - 知乎
[2] - How to do Transfer learning with Efficientnet
[3] - Keras Applications
[4] - 谷歌EfficientNet缩放模型,PyTorch实现出炉,登上GitHub热榜丨Demo可用
[5] - Github - kartikdutt18/Kaggle-ATPOS-Efficient_Net
[6] - Kaggle - Efficient_Net
29 条评论
博主你好,如果我在用pytorch版本的时候,想要微调模型,只不过我只需要它在分类之前的特征向量,这样的微调应该怎么写呢,多谢啦~
2.6 章节可参考.
博主你好,请问一下,使用from efficientnet.tfkeras import EfficientNetB0的时候,是不需要preprocess_input的是吗,我看你的代码里没有写这个,只是把图片除以了255(归一化到了0-1之间),多谢啦
预测吗?有center_crop_and_resize等处理
嗯呢,center_crop_and_resize其实并不会改变值,只是改变图片的尺寸呢
可以看下 preprocess_input 这个函数,efficientnet.tfkeras 里的
请问EfficientNetB0~B7分别有多少层呢?
多个 MBConvBlock 的重复.
有些网站写B0是237层 要知道实际有几层要print model summary来看吗?
可以看下 model 的结构,还有,你说的网络层是单说 conv 层还是其他的网络层都算?
像是ResNet50是50层这样
ResNet50的50层是卷积层和最后的一个全连接层,四组block,每个block里面有三个卷积层,加上开始的卷积层和输出处的全连接层(3+4+6+3)*3+1+1=50. EfficientNet 的可以参考统计相爱.
您好 我了解ResNet50了,不过EfficientNet网路上查到是由5个Module所组成,看不懂要如何算请博主再教学一下 谢谢!
5个Module 可以类比 ResNet50 的 block,数一下卷积层数.
您好B0卷积层数我算是81层,不過與237层差的有点远
那估计不只是卷积层了,网络总层数?
对的 应该是,那么卷积层是81层没错吗
应该是的
博主你好,请问怎么把keras的efficientnet集成到tf代码里呀
tf2.0 已经封装了 keras
请问怎么直接用Keras - EfficientNet来提取特征呢
可参考:https://keras.io/zh/applications/
直接取特征即可,如features = model.predict(input)
谢谢博主,请问用Keras - EfficientNet预测和提取特征的时候怎么设置它用GPU呀
可参考:https://www.aiuai.cn/aifarm197.html
博主,没太明白你的意思 我自己写一个模型我知道怎么用GPU,只是这里的Keras - EfficientNet提供的是一个已经train好的模型,我该怎么设置它用GPU预测而不是CPU呢?我看tf里面要用GPU一般都会涉及到sesion.run,可是Keras - EfficientNet好像没有这个东西诶
  多谢啦
多谢啦
Keras 采用 tensorflow-gpu 版本的是默认调用的就是 GPU 预测的;除非采用的 tensorflow 后端.
博主有碰到model = EfficientNetB0(weights='imagenet')时在线权重下载不下来的情况吗
有可能是网络原因