原文:Alpha Blending using OpenCV (C++ / Python) - 2019.04.10
作者:Sunita Nayak
Matting - 图像抠图简记 - AIUAI 中简单说明了下抠图问题的定义及采用 PIL Image.blend() 函数的图像融合.
这里,主要关于 如何将透明 PNG 图(Alpha图)与图片进行融合. 并给出了基于 OpenCV 的 C++ 和 Python 实现.
1. Alpha 通道融合(Alpha blending)
Alpha 融合是将一张前景透明图像覆盖到一张背景图片上的过程.
透明图往往是四通道的图像(如,透明 PNG 图),且是可分离的. 透明 mask 图也被叫作 alpha mask 或 alpha matte.

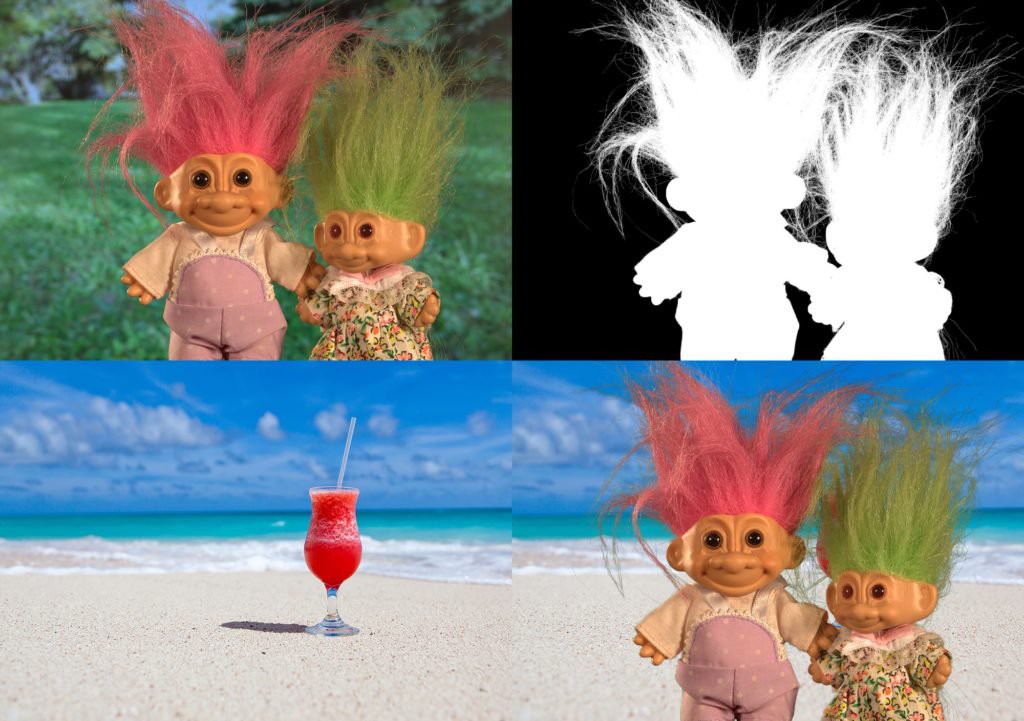
图:(上左)-前景图像;(上右)-alpha mask;(下左)-背景图像;(下右)-最终组合图像. From: http://www.alphamatting.com/datasets.php 和 https://www.publicdomainpictures.net/en/view-image.php?image=21543&picture=drink-on-beach.
如图,左上图为前景图像,右上图为 alpha mask 图,下左为背景图像,下右为采用 alpha mask 将前景图像和背景图像融合得到的组合图.
Alpha blending 背后的数据公式为:
$$ I = \alpha F +(1 - \alpha)B $$
对于图像的每个像素,需要采用 alpha mask ($\alpha$) 将前景图像($F$) 和背景图像($B$)进行组合.
其中,$0 \leq \alpha \leq 1$.
[1] - 当 $\alpha = 0$ 时,输出像素值为背景图像.
[2] - 当 $\alpha = 1$ 时,输出像素值为前景图像.
[3] - 当 $ 0 < \alpha < 1$ 时,输出像素值是背景图像和前景图像的融合. 实际场景中,alpha mask 边界处的像素值往往在 [0, 1] 区间.
2. Python 实现
import cv2

#读取图像
foreground = cv2.imread("puppets.png")  #前景
background = cv2.imread("ocean.png")    #背景
alpha = cv2.imread("puppets_alpha.png") #alpha

#Convert uint8 to float
foreground = foreground.astype(float)
background = background.astype(float)

#Normalize the alpha mask to keep intensity between 0 and 1
alpha = alpha.astype(float)/255

#Multiply the foreground with the alpha matte
foreground = cv2.multiply(alpha, foreground)

#Multiply the background with ( 1 - alpha )
background = cv2.multiply(1.0 - alpha, background)

#Add the masked foreground and background.
outImage = cv2.add(foreground, background)

#Display image
cv2.imshow("outImg", outImage/255)
cv2.waitKey(0)
3. C++ 实现
#include opencv2/opencv.hpp

using namespace cv;
using namespace std;

int main(int argc, char** argv)
{

    //Read the images
    Mat foreground = imread("puppets.png");
    Mat background = imread("ocean.png");
    Mat alpha = imread("puppets_alpha.png");

    //Convert Mat to float data type
    foreground.convertTo(foreground, CV_32FC3);
    background.convertTo(background, CV_32FC3);

    //Normalize the alpha mask to keep intensity between 0 and 1
    alpha.convertTo(alpha, CV_32FC3, 1.0/255); //

    //Storage for output image
    Mat ouImage = Mat::zeros(foreground.size(), foreground.type());

    //Multiply the foreground with the alpha matte
    multiply(alpha, foreground, foreground);

    //Multiply the background with ( 1 - alpha )
    multiply(Scalar::all(1.0)-alpha, background, background);

    //Add the masked foreground and background.
    add(foreground, background, ouImage);

    //Display image
    imshow("alpha blended image", ouImage/255);
    waitKey(0);

    return 0;
}
4. 更有效的 C++ 实现
上述的Python和C++实现的 alpha blending 代码是比较整洁的,但其效率不够. 因为在 alpha blending 的过程中包含两次对前景图像的处理,分别用于与 alpha 相乘和与 masked 背景图像的相加. 类似地,对背景图像也包含类似的处理.
对于小尺寸(如250x250)和中尺寸(如800x800) 的图像,上述实现还能应付,但其效率是很有待提升的,尤其是对于大尺寸(如 2000x2000)的图像.
void alphaBlend(Mat& foreground, Mat& background, Mat& alpha, Mat& outImage)
{
     //Find number of pixels.
     int numberOfPixels = foreground.rows * foreground.cols * foreground.channels();

     //Get floating point pointers to the data matrices
     float* fptr = reinterpret_cast<float*>(foreground.data);
     float* bptr = reinterpret_cast<float*>(background.data);
     float* aptr = reinterpret_cast<float*>(alpha.data);
     float* outImagePtr = reinterpret_cast<float*>(outImage.data);

     //Loop over all pixesl ONCE
     for(
       int i = 0;
       i < numberOfPixels;
       i++, outImagePtr++, fptr++, aptr++, bptr++
     )
     {
         *outImagePtr = (*fptr)*(*aptr) + (*bptr)*(1 - *aptr);
     }
}
5. 效率对比
对比 C++ 实现和更有效的 C++ 实现 对于不同尺寸图像的效率对比. 如下表(运行 3000 次以上求平均后的值). 可以看出,对于大尺寸大图像,后者具有更快的速度,耗费时间几乎减半. 有一点疑问之处在于,对于小尺寸图片,后者的效率反而更慢了.
| 图像尺寸 | Using functions - multiply, add (in milliseconds) | Using direct access (in milliseconds) |
|---|---|---|
| 230 x 162 | 0.156 | 0.364 |
| 1000 x 704 | 7.856 | 7.102 |
| 2296 x 1617 | 54.014 | 39.985 |
| 4592 x 3234 | 355.502 | 161.34 |
4 comments
作者你好,留个email或者啥的,交流matting技术,一起合作
你好,QQ:2258922522,欢迎交流学习.
想问下作者,对于单人人体姿态估计问题中,想获取网络最后输出的关键点特征图的每个维度[一共16个维度](如,64×64×16,16为关键点个数)和原图的融合,这样也行么,还是需要进行类激活映射才行
关键点和原图融合是指在原图上画出关键点 heatmap 吗?