这里主要是对 基于 YOLOV3 和 OpenCV的目标检测(PythonC++)[译] Python 完整实现的整理.
OpenCV DNN支持图像分类、对象检测、图像分割常见通用网络模型.
1. YOLOV3 简述
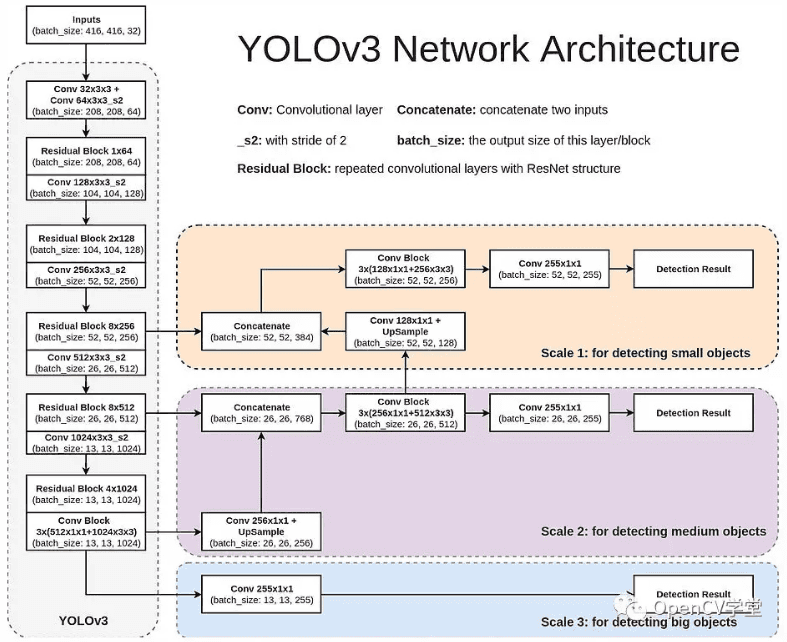
YOLOV3 网络结构如图:

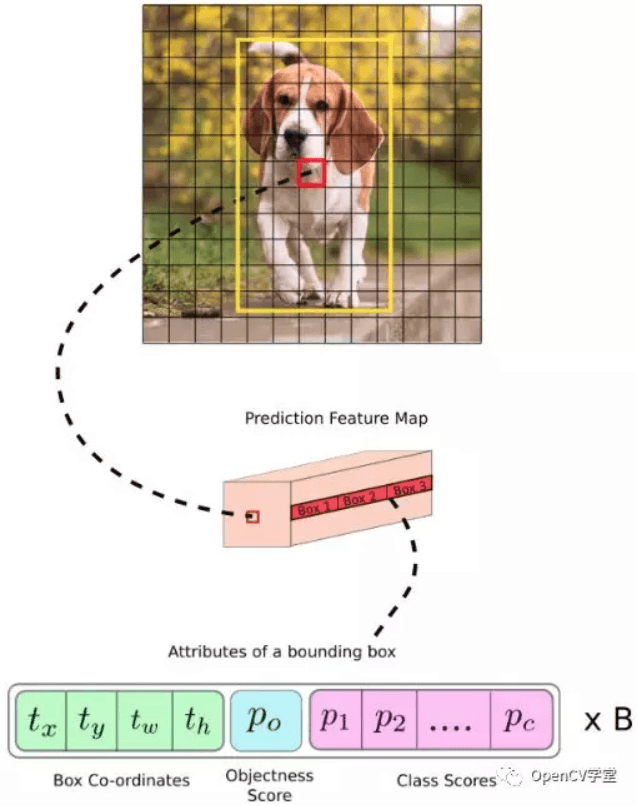
YOLOV3 采用全卷积结构,有效减少了模型参数总数,取消了softmax层,模型输出结构如图:

2. YOLOV3 DNN 实现
模型下载:
# coco.names
wget https://github.com/pjreddie/darknet/blob/master/data/coco.names?raw=true -O ./coco.names

# YOLOV3
wget https://github.com/pjreddie/darknet/blob/master/cfg/yolov3.cfg?raw=true -O ./yolov3.cfg
wget https://pjreddie.com/media/files/yolov3.weights

# YOLOV3-tiny
wget https://github.com/pjreddie/darknet/blob/master/cfg/yolov3-tiny.cfg
wget https://pjreddie.com/media/files/yolov3-tiny.weights
完整实现:
#!/usr/bin/python3
# -*- coding: utf-8 -*-
import cv2
import sys
import numpy as np
import os
import matplotlib.pyplot as plt
import time


class general_yolov3(object):
    def __init__(self, modelpath, is_tiny=False):
        self.conf_threshold = 0.5  # Confidence threshold
        self.nms_threshold  = 0.4  # NMS threshold
        self.net_width  = 416      # 网络输入图像宽度
        self.net_height = 416      # 网络输入图像高度

        self.classes = self.get_coco_names()
        self.yolov3_model = self.get_yolov3_model(modelpath, is_tiny)
        self.outputs_names = self.get_outputs_names()


    def get_coco_names(self):
        # COCO 物体类别名
        classesFile = "/path/to/coco.names"
        classes = None
        with open(classesFile, 'rt') as f:
            classes = f.read().rstrip('\n').split('\n')

        return classes


    def get_yolov3_model(self, modelpath, is_tiny):
        if is_tiny:
            cfg_file = os.path.join(modelpath, "yolov3-tiny.cfg")
            weights_file = os.path.join(modelpath, "yolov3-tiny.weights")
        else:
            cfg_file = os.path.join(modelpath, "yolov3.cfg")
            weights_file = os.path.join(modelpath, "yolov3.weights")

        net = cv2.dnn.readNetFromDarknet(cfg_file, weights_file)
        net.setPreferableBackend(cv2.dnn.DNN_BACKEND_OPENCV)
        net.setPreferableTarget(cv2.dnn.DNN_TARGET_CPU)

        return net


    def get_outputs_names(self):
        # 所有网络层名
        layersNames = self.yolov3_model.getLayerNames()
        # 输出网络层名,如无连接输出的网络层.
        return [layersNames[i[0] - 1] for i in
                self.yolov3_model.getUnconnectedOutLayers()]


    def postprocess(self, img_cv2, outputs):
        # 检测结果后处理
        # 采用 NMS 移除低 confidence 的边界框
        img_height, img_width, _ = img_cv2.shape

        # 只保留高 confidence scores 的输出边界框
        # 将最高 score 的类别标签作为边界框的类别标签
        class_ids = []
        confidences = []
        boxes = []
        for output in outputs:
            for detection in output:
                scores = detection[5:]
                class_id = np.argmax(scores)
                confidence = scores[class_id]
                if confidence > self.conf_threshold:
                    center_x = int(detection[0] * img_width)
                    center_y = int(detection[1] * img_height)
                    width = int(detection[2] * img_width)
                    height = int(detection[3] * img_height)
                    left = int(center_x - width / 2)
                    top = int(center_y - height / 2)
                    class_ids.append(class_id)
                    confidences.append(float(confidence))
                    boxes.append([left, top, width, height])

        # NMS 处理, 消除 lower confidences 的冗余重叠边界框
        indices = cv2.dnn.NMSBoxes(boxes,
                                   confidences,
                                   self.conf_threshold,
                                   self.nms_threshold)
        results = []
        for ind in indices:
            res_box = {}
            res_box["class_id"] = class_ids[ind[0]]
            res_box["score"] = confidences[ind[0]]

            box = boxes[ind[0]]
            res_box["box"] = (box[0],
                              box[1],
                              box[0]+box[2],
                              box[1]+box[3])
            results.append(res_box)

        return results


    def predict(self, img_file):
        img_cv2 = cv2.imread(img_file)

        # 创建网络输入的 4D blob.
        blob = cv2.dnn.blobFromImage(
            img_cv2, 1 / 255,
            (self.net_width, self.net_height),
            [0, 0, 0], 1, crop=False)
        # 设置模型的输入 blob
        self.yolov3_model.setInput(blob)
        # 前向计算
        outputs = self.yolov3_model.forward(self.outputs_names)
        # 后处理
        results = self.postprocess(img_cv2, outputs)

        return results


    def vis_res(self, img_file, results):
        # 可视化检测结果
        img_cv2 = cv2.imread(img_file)
        for result in results:
            left, top, right, bottom = result["box"]
            cv2.rectangle(img_cv2,
                          (left, top),
                          (right, bottom),
                          (255, 178, 50), 3)

            # 边界框的类别名和 confidence score
            label = '%.2f' % result["score"]
            class_id = result["class_id"]
            if self.classes:
                assert (result["class_id"] < len(self.classes))
                label = '%s:%s' % (self.classes[class_id], label)
            #
            label_size, baseline = cv2.getTextSize(
                label, cv2.FONT_HERSHEY_SIMPLEX, 0.5, 1)
            top = max(top, label_size[1])
            cv2.rectangle(
                img_cv2,
                (left, top - round(1.5 * label_size[1])),
                (left + round(1.5 * label_size[0]),
                 top + baseline), (255, 0, 0),
                cv2.FILLED)
            cv2.putText(img_cv2, label, (left, top),
                        cv2.FONT_HERSHEY_SIMPLEX,
                        0.75, (0, 0, 0), 1)
        # 计算速率信息
        # getPerfProfile() 函数返回模型的推断总时间以及
        # 每一网络层的耗时(in layersTimes).
        t, _ = self.yolov3_model.getPerfProfile()
        label = 'Inference time: %.2f ms' % \
                (t * 1000.0 / cv2.getTickFrequency())
        cv2.putText(img_cv2, label, (0, 15),
                    cv2.FONT_HERSHEY_SIMPLEX, 0.5, (0, 0, 255))

        plt.figure(figsize=(10, 8))
        plt.imshow(img_cv2[:,:,::-1])
        plt.axis("off")
        plt.show()


if __name__ == '__main__':
    print("[INFO]Yolov3 object detection in OpenCV.")

    img_file = "test.jpg"

    start = time.time()
    modelpath = "/path/to/yolov3_models/"
    yolov3_model = general_yolov3(modelpath, is_tiny=True)
    print("[INFO]Model loads time: ", time.time() - start)

    start = time.time()
    results = yolov3_model.predict(img_file)
    print("[INFO]Model predicts time: ", time.time() - start)
    yolov3_model.vis_res(img_file, results)

    print("[INFO]Done.")
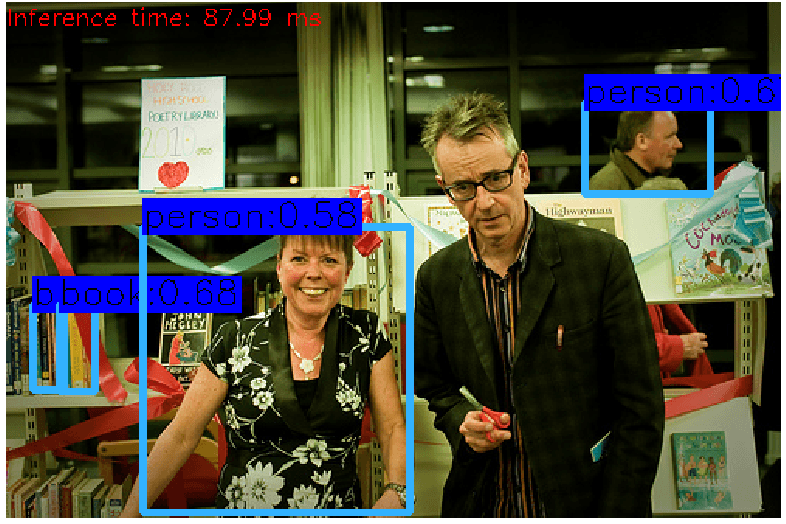
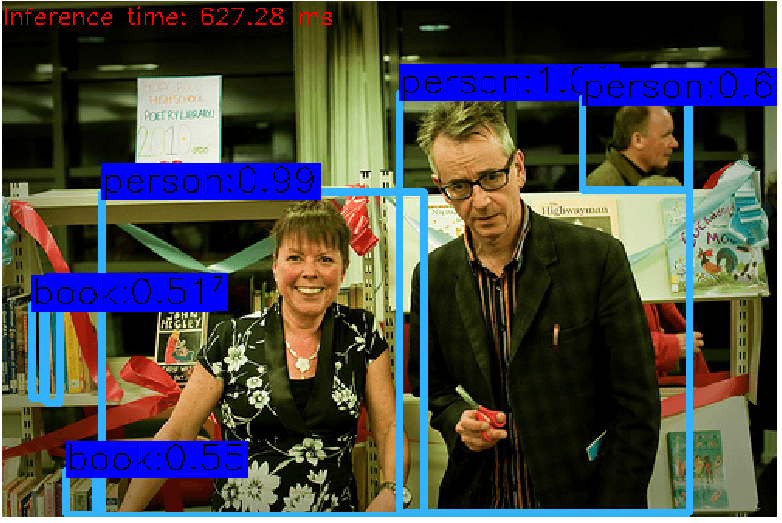
如:
yolov3-tiny 模型:

yolov3 模型:

3. 参考资料
[1] - OpenCV4.0如何跑YOLOv3对象检测模型 - OpenCV学堂