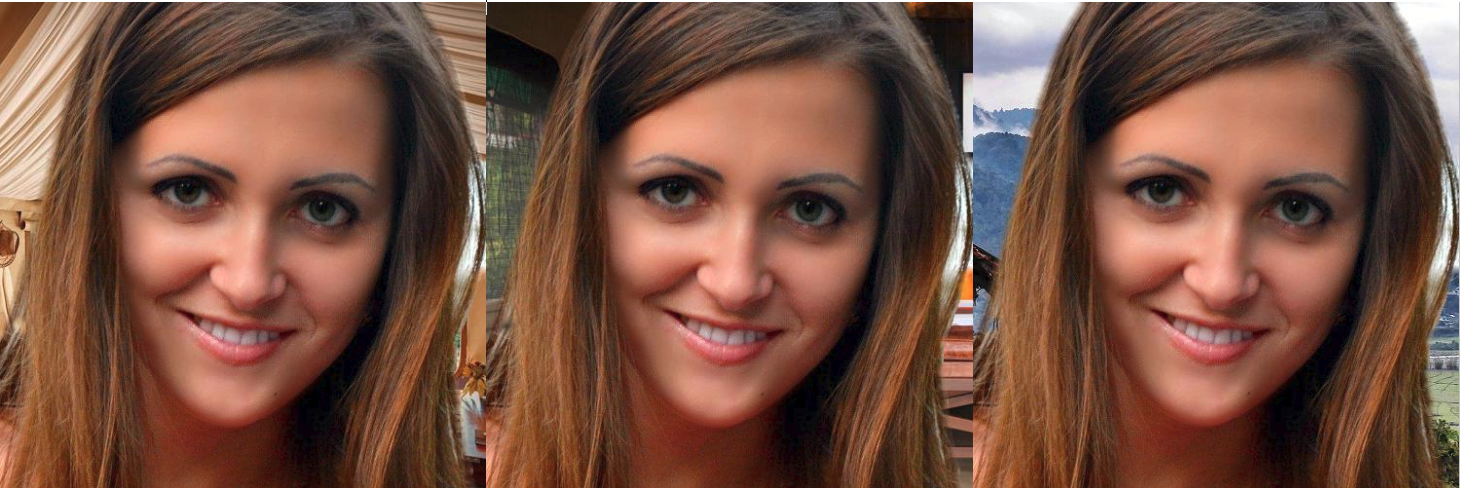
采用 CRF-RNN 语义分割方法 + Matting 的肖像分割.
Github - shihui2010/portrait_matting - Keras/Tensorflow 实现.
项目里包含了 CRF-RNN 语义分割方法的 Keras/Tensoflow 实现. - CRF-RNN - Github Keras/Tensorflow
[1] - CRF-RNN论文 - Conditional Random Fields as Recurrent Neural Networks - ICCV2015.
[2] - CRF-RNN Demo - ICCV2015 的最佳 Demo.
[3] - CRF-RNN Caffe 实现. CRF-RNN 的 Keras/Tensorflow 实现的结果基本与 Caffe 实现的精度一致.

1. 安装
[1] - 依赖项安装
CPU 版本 - requirements.txt:
tensorflow
keras
h5py
Pillow
GPU 版本 - requirements_gpu.txt:
tensorflow-gpu
keras
h5py
Pillow
[2] - 构建 CRF-RNN 定制 op 的 C++ 代码
在 crfasrnn_keras/src/cpp 路径运行 make:
cd crfasrnn_keras/src/cpp
make
编译后,会得到一个新文件 high_dim_filter.so.
参考 Tensorflow - building a custom op.
[3] - 下载预训练模型
2. 测试模型
- 原始图片路径 -
big_figure/ - 背景图片 -
bg/
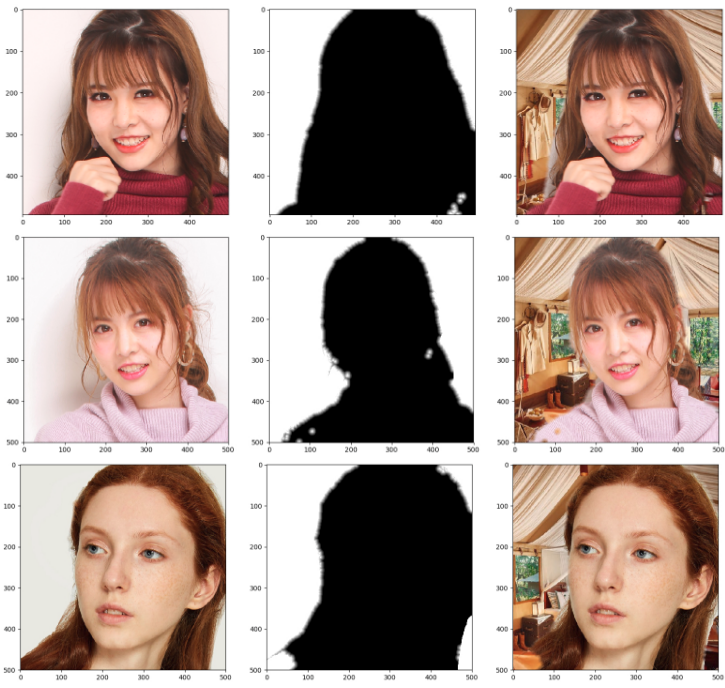
包含肖像的原图图片 big_figure/ 中,需要先检测到肖像,然后再进一步分割和Matting.
结果:

2.1. 肖像检测
肖像检测 - 采用 opencv 的 cv2.CascadeClassifier(model_name) 进行实现.
import os
import cv2
import matplotlib.pyplot as plt

MIN_IMG_SIZE = 200

class CascadeOpenCV(object):
    def __init__(self,
                 model_name="haarcascade_frontalface_default.xml",
                 min_size=5):
        self.min_size = min_size
        self.face_cascade = cv2.CascadeClassifier(model_name)

    def run(self, img):
        """
        :param img: cv2 imread object
        :return: list of bounding box [x, y, w, h]
        """
        if img is None:
            return None
        min_size = min(img.shape[:2])
        if min_size < MIN_IMG_SIZE:
            factor = MIN_IMG_SIZE / min_size
            img = cv2.resize(img, None,
                             fx=factor, fy=factor,
                             interpolation=cv2.INTER_CUBIC)

        gray = cv2.cvtColor(img, cv2.COLOR_BGR2GRAY)
        faces = self.face_cascade.detectMultiScale(gray, 1.3, 5)

        return faces

if __name__ == "__main__":
    MAX_IMG_SIZE = 500
    PAD = 100
    FACE = CascadeOpenCV()
    path = "big_figure"
    output_idx = 0
    for fname in os.listdir(path):
        try:
            fname = os.path.join(path, fname)
            img = cv2.imread(fname)
            faces = FACE.run(img)
            if len(faces) != 1:
                continue
            img_size = img.shape
            x, y, w, h = faces[0]

            crop = img[max(y - PAD, 0):min(y + h + PAD, img_size[0]),
                       max(x - PAD, 0):min(x + w + PAD, img_size[1])]
            if max(crop.shape) > MAX_IMG_SIZE:
                factor = float(MAX_IMG_SIZE) / max(crop.shape)
                crop = cv2.resize(crop, None,
                                  fx=factor, fy=factor,
                                  interpolation=cv2.INTER_CUBIC)
            plt.subplot(1, 2, 1)
            plt.imshow(img[:,:,::-1])
            plt.subplot(1, 2, 2)
            plt.imshow(crop[:,:,::-1])
            plt.show()
            output_idx += 1
            print output_idx
        except:
            pass
2.2. 语义分割 + Matting
import sys
import os
import cv2
from PIL import Image
import random
import numpy as np
import math
from itertools import product
import matplotlib.pyplot as plt
import scipy.misc

from crop_portrait import CascadeOpenCV

from crfasrnn_keras.src.crfrnn_model import get_crfrnn_model_def
from crfasrnn_keras.src import util

_PALETTE = [0, 0, 0,
            128, 0, 0,
            0, 128, 0,
            128, 128, 0,
            0, 0, 128,
            128, 0, 128,
            0, 128, 128,
            128, 128, 128,
            64, 0, 0,
            192, 0, 0,
            64, 128, 0,
            192, 128, 0,
            64, 0, 128,
            192, 0, 128,
            64, 128, 128,
            192, 128, 128,
            0, 64, 0,
            128, 64, 0,
            0, 192, 0,
            128, 192, 0,
            0, 64, 128,
            128, 64, 128,
            0, 192, 128,
            128, 192, 128,
            64, 64, 0,
            192, 64, 0,
            64, 192, 0,
            192, 192, 0]
_PAD = 50
MIN_IMG_SIZE = 120
FACE = CascadeOpenCV("haarcascade_frontalface_default.xml")

def blur_mask_edge(mask, pixel):
    """
    :param pixel: number of pixels for blurring at edge
    :param mask: "RGBA" format image
    :return: "RGBA" format blurred image
    """
    w, h = mask.size

    # identifying edge - 确定边缘
    edge_points = []
    for x, y in product(range(w), range(h)):
        if mask.getpixel((x, y)) != (0, 0, 0, 255):
            continue
        xs = range(max(0, x - 1), min(w, x + 1))
        ys = range(max(0, y - 1), min(h, y + 1))
        for xi, yi in product(xs, ys):
            if mask.getpixel((xi, yi)) == (0, 0, 0, 0):
                edge_points.append((x, y))
                break

    # blur mask edge - mask 边缘模糊
    for x, y in edge_points:
        xs = range(max(0, x - pixel), min(w, x + pixel))
        ys = range(max(0, y - pixel), min(h, y + pixel))
        for xi, yi in product(xs, ys):
            min_dist = math.sqrt((x - xi) ** 2 + (y - yi) ** 2)
            offset = int(min_dist / float(pixel) * 255)
            origin = mask.getpixel((xi, yi))[3]
            if origin != 0 and offset < origin:
                mask.putpixel((xi, yi), (0, 0, 0, offset))
    return mask

def matting(img, label, bg, output_fname):
    img_label = np.asarray(
        label.convert(mode="P", palette=_PALETTE))
    assert img.shape[:2] == img_label.shape[:2], \
        "Label Image Size disagree with the One of Origin One"
    mat = np.where(img_label == 15)
    mask = Image.new("RGBA", img.shape[:2])
    for x, y in zip(mat[0].tolist(), mat[1].tolist()):
        mask.putpixel([y, x], (0, 0, 0, 255))

    mask = blur_mask_edge(mask, 10) # mask 边缘模糊

    bw, bh = bg.size
    fw, fh = img.shape[:2]
    # if background smaller than fore-scene, then resize background
    if bw <= fw or bh <= fh:
        factor = max(float(fw) / bw, float(fh) / bh)
        bg = bg.resize((int(bw * factor + 10), int(bh * factor + 10)))
        bw, bh = bg.size
    sw = random.choice(range(0, bw - fw))
    sh = random.choice(range(0, bh - fh))
    bg_crop = bg.crop([sw, sh, sw + fw, sh + fh])
    bounding_box = [0, 0, fh, fw]
    # part = origin_img.crop(bounding_box)
    mask = mask.crop(bounding_box)
    # print part, bg_crop, mask
    # print img, bg_crop.size, mask.size
    img = Image.fromarray(img)
    comp = Image.composite(img, bg_crop, mask)
    # comp.save(output_fname)

    plt.subplot(1, 3, 1)
    plt.imshow(img)
    plt.subplot(1, 3, 2)
    plt.imshow(mask)
    plt.subplot(1, 3, 3)
    plt.imshow(comp)
    plt.show()

if __name__ == "__main__":
    MAX_IMG_SIZE = 500
    PAD = 100
    FACE = CascadeOpenCV()  # 加载肖像模型

    bgs = list()
    for bg_fname in os.listdir("bg"):
        if bg_fname.endswith(".jpg"):
            bgs.append(Image.open(os.path.join("bg", bg_fname)))

    if len(sys.argv) == 1:
        data_dir = "big_figure/"
    else:
        data_dir = sys.argv[1]

    model = get_crfrnn_model_def()  # crfrnn

    saved_model_path = 'crfrnn_keras_model.h5'
    model.load_weights(saved_model_path)  # 加载 CRF-RNN 模型

    for fname in os.listdir(data_dir):
        input_file = os.path.join(data_dir, fname)
        img = cv2.imread(input_file, cv2.IMREAD_COLOR)
        faces = FACE.run(img)  # 检测肖像
        if len(faces) != 1:
            continue
        img_size = img.shape
        x, y, w, h = faces[0]

        crop = img[max(y - PAD, 0):min(y + h + PAD, img_size[0]),
                   max(x - PAD, 0):min(x + w + PAD, img_size[1])]
        if max(crop.shape) > MAX_IMG_SIZE:
            factor = float(MAX_IMG_SIZE) / max(crop.shape)
            crop = cv2.resize(crop, None,
                              fx=factor, fy=factor,
                              interpolation=cv2.INTER_CUBIC)
        img_data, img_h, img_w = util.get_preprocessed_image(crop)

        probs = model.predict(img_data, verbose=False)[0, :, :, :]
        label = util.get_label_image(probs, img_h, img_w)
        # label is np.array, segmentation of the img_data
        if not os.path.exists("output"):
            os.mkdir("output")

        crop = crop[...,::-1]

        for idx, bg in enumerate(bgs):
            out_fname = os.path.join("output", fname[:-4] + "_" + str(idx) + ".jpg")
            matting(crop, label, bg, out_fname)

    print('Done.')
2.3. crfrnn 模型
from keras.models import Model
from keras.layers import Conv2D, MaxPooling2D, \
                        Input, ZeroPadding2D, \
                        Dropout, Conv2DTranspose, \
                        Cropping2D, Add
from crfrnn_layer import CrfRnnLayer

def get_crfrnn_model_def():
    """
    Returns Keras CRN-RNN model definition.
    Currently, only 500 x 500 images are supported.
    However, one can get this to work with different image sizes
    by adjusting the parameters of the Cropping2D layers below.
    """

    channels, height, weight = 3, 500, 500

    # Input
    input_shape = (height, weight, 3)
    img_input = Input(shape=input_shape)

    # Add plenty of zero padding
    x = ZeroPadding2D(padding=(100, 100))(img_input)

    # VGG-16 convolution block 1
    x = Conv2D(64, (3, 3), activation='relu', padding='valid', name='conv1_1')(x)
    x = Conv2D(64, (3, 3), activation='relu', padding='same', name='conv1_2')(x)
    x = MaxPooling2D((2, 2), strides=(2, 2), name='pool1')(x)

    # VGG-16 convolution block 2
    x = Conv2D(128, (3, 3), activation='relu', padding='same', name='conv2_1')(x)
    x = Conv2D(128, (3, 3), activation='relu', padding='same', name='conv2_2')(x)
    x = MaxPooling2D((2, 2), strides=(2, 2), name='pool2', padding='same')(x)

    # VGG-16 convolution block 3
    x = Conv2D(256, (3, 3), activation='relu', padding='same', name='conv3_1')(x)
    x = Conv2D(256, (3, 3), activation='relu', padding='same', name='conv3_2')(x)
    x = Conv2D(256, (3, 3), activation='relu', padding='same', name='conv3_3')(x)
    x = MaxPooling2D((2, 2), strides=(2, 2), name='pool3', padding='same')(x)
    pool3 = x

    # VGG-16 convolution block 4
    x = Conv2D(512, (3, 3), activation='relu', padding='same', name='conv4_1')(x)
    x = Conv2D(512, (3, 3), activation='relu', padding='same', name='conv4_2')(x)
    x = Conv2D(512, (3, 3), activation='relu', padding='same', name='conv4_3')(x)
    x = MaxPooling2D((2, 2), strides=(2, 2), name='pool4', padding='same')(x)
    pool4 = x

    # VGG-16 convolution block 5
    x = Conv2D(512, (3, 3), activation='relu', padding='same', name='conv5_1')(x)
    x = Conv2D(512, (3, 3), activation='relu', padding='same', name='conv5_2')(x)
    x = Conv2D(512, (3, 3), activation='relu', padding='same', name='conv5_3')(x)
    x = MaxPooling2D((2, 2), strides=(2, 2), name='pool5', padding='same')(x)

    # Fully-connected layers converted to convolution layers
    x = Conv2D(4096, (7, 7), activation='relu', padding='valid', name='fc6')(x)
    x = Dropout(0.5)(x)
    x = Conv2D(4096, (1, 1), activation='relu', padding='valid', name='fc7')(x)
    x = Dropout(0.5)(x)
    x = Conv2D(21, (1, 1), padding='valid', name='score-fr')(x)

    # Deconvolution
    score2 = Conv2DTranspose(21, (4, 4), strides=2, name='score2')(x)

    # Skip connections from pool4
    score_pool4 = Conv2D(21, (1, 1), name='score-pool4')(pool4)
    score_pool4c = Cropping2D((5, 5))(score_pool4)
    score_fused = Add()([score2, score_pool4c])
    score4 = Conv2DTranspose(21,
                             (4, 4),
                             strides=2,
                             name='score4',
                             use_bias=False)(score_fused)

    # Skip connections from pool3
    score_pool3 = Conv2D(21, (1, 1), name='score-pool3')(pool3)
    score_pool3c = Cropping2D((9, 9))(score_pool3)

    # Fuse things together
    score_final = Add()([score4, score_pool3c])

    # Final up-sampling and cropping
    upsample = Conv2DTranspose(21,
                               (16, 16),
                               strides=8,
                               name='upsample',
                               use_bias=False)(score_final)
    upscore = Cropping2D(((31, 37), (31, 37)))(upsample)

    output = CrfRnnLayer(image_dims=(height, weight),
                         num_classes=21,
                         theta_alpha=160.,
                         theta_beta=3.,
                         theta_gamma=3.,
                         num_iterations=10,
                         name='crfrnn')([upscore, img_input])

    # Build the model
    model = Model(img_input, output, name='crfrnn_net')

    return model
2.4. crfrnn_layer
import os
import tensorflow as tf
from tensorflow.python.framework import ops
custom_module = tf.load_op_library(os.path.join(os.path.dirname(__file__), 'cpp', 'high_dim_filter.so'))


@ops.RegisterGradient('HighDimFilter')
def _high_dim_filter_grad(op, grad):
    """ Gradients for the HighDimFilter op. We only need to calculate the gradients
    w.r.t. the first input (unaries) as we never need to backprop errors to the
    second input (RGB values of the image).

    Args:
    op: The `high_dim_filter` operation that we are differentiating.
    grad: Gradients with respect to the output of the `high_dim_filter` op.

    Returns:
    Gradients with respect to the input of `high_dim_filter`.
    """

    rgb = op.inputs[1]
    grad_vals = custom_module.high_dim_filter(
        grad,
        rgb,
        bilateral=op.get_attr('bilateral'),
        theta_alpha=op.get_attr('theta_alpha'),
        theta_beta=op.get_attr('theta_beta'),
        theta_gamma=op.get_attr('theta_gamma'),
        backwards=True)

    return [grad_vals, tf.zeros_like(rgb)]

#
import numpy as np
import tensorflow as tf
from keras.engine.topology import Layer
#import high_dim_filter_loader
custom_module = high_dim_filter_loader.custom_module


def _diagonal_initializer(shape):
    return np.eye(shape[0], shape[1], dtype=np.float32)


def _potts_model_initializer(shape):
    return -1 * _diagonal_initializer(shape)


class CrfRnnLayer(Layer):
    """
    Implements the CRF-RNN layer described in:

    Conditional Random Fields as Recurrent Neural Networks,
    S. Zheng, S. Jayasumana, B. Romera-Paredes, V. Vineet, Z. Su, D. Du, C. Huang and P. Torr,
    ICCV 2015
    """

    def __init__(self, image_dims, num_classes,
                 theta_alpha, theta_beta, theta_gamma,
                 num_iterations, **kwargs):
        self.image_dims = image_dims
        self.num_classes = num_classes
        self.theta_alpha = theta_alpha
        self.theta_beta = theta_beta
        self.theta_gamma = theta_gamma
        self.num_iterations = num_iterations
        self.spatial_ker_weights = None
        self.bilateral_ker_weights = None
        self.compatibility_matrix = None
        super(CrfRnnLayer, self).__init__(**kwargs)

    def build(self, input_shape):
        # Weights of the spatial kernel
        self.spatial_ker_weights = self.add_weight(
            name='spatial_ker_weights',
            shape=(self.num_classes, self.num_classes),
            initializer=_diagonal_initializer,
            trainable=True)

        # Weights of the bilateral kernel
        self.bilateral_ker_weights = self.add_weight(
            name='bilateral_ker_weights',
            shape=(self.num_classes, self.num_classes),
            initializer=_diagonal_initializer,
            trainable=True)

        # Compatibility matrix
        self.compatibility_matrix = self.add_weight(
            name='compatibility_matrix',
            shape=(self.num_classes, self.num_classes),
            initializer=_potts_model_initializer,
            trainable=True)

        super(CrfRnnLayer, self).build(input_shape)

    def call(self, inputs):
        unaries = tf.transpose(inputs[0][0, :, :, :], perm=(2, 0, 1))
        rgb = tf.transpose(inputs[1][0, :, :, :], perm=(2, 0, 1))

        c, h, w = self.num_classes, self.image_dims[0], self.image_dims[1]
        all_ones = np.ones((c, h, w), dtype=np.float32)

        # Prepare filter normalization coefficients
        spatial_norm_vals = custom_module.high_dim_filter(
            all_ones,
            rgb,
            bilateral=False,
            theta_gamma=self.theta_gamma)
        bilateral_norm_vals = custom_module.high_dim_filter(
            all_ones,
            rgb,
            bilateral=True,
            theta_alpha=self.theta_alpha,
            theta_beta=self.theta_beta)
        q_values = unaries

        for i in range(self.num_iterations):
            softmax_out = tf.nn.softmax(q_values, 0)

            # Spatial filtering
            spatial_out = custom_module.high_dim_filter(
                softmax_out,
                rgb,
                bilateral=False,
                theta_gamma=self.theta_gamma)
            spatial_out = spatial_out / spatial_norm_vals

            # Bilateral filtering
            bilateral_out = custom_module.high_dim_filter(
                softmax_out,
                rgb,
                bilateral=True,
                theta_alpha=self.theta_alpha,
                theta_beta=self.theta_beta)
            bilateral_out = bilateral_out / bilateral_norm_vals

            # Weighting filter outputs
            message_passing = (tf.matmul(self.spatial_ker_weights,
                                         tf.reshape(spatial_out, (c, -1))) +
                               tf.matmul(self.bilateral_ker_weights,
                                         tf.reshape(bilateral_out, (c, -1))))

            # Compatibility transform
            pairwise = tf.matmul(self.compatibility_matrix, message_passing)

            # Adding unary potentials
            pairwise = tf.reshape(pairwise, (c, h, w))
            q_values = unaries - pairwise

        return tf.transpose(tf.reshape(q_values, (1, c, h, w)), perm=(0, 2, 3, 1))

    def compute_output_shape(self, input_shape):
        return input_shape
3. 说明
[1] - 当前 CrfRnnLayer 的实现仅支持 batch_size==1.
[2] - CrfRnnLayer 的 GPU 实现在 CUDA9.0 和 Tensorflow1.7 上测试.
11 comments
方便留一下qq吗?感觉这个评论没法输入图片或代码……
你好,谢谢你的分享!我向问一下在“构建 CRF-RNN 定制 op 的 C++ 代码”这步时要用make命令。如果是在windows系统下应该怎么生成.so文件呢?链接里说的太模糊了没看懂……∠( ᐛ 」∠)_
这个是基于 Ubuntu 系统的,在 Windows 系统没有进行实践过. make 是生成 op 的操作,可以参考下在Windows中 TensorFlow op 的构建,https://www.tensorflow.org/extend/adding_an_op#build_the_op_library
也就是说用make命令生成.so文件相当于在windows系统下op的构建吗?这个crfasrnn算是一个op或函数吗?
make 命令是生成新的 op,是crfasrnn 中自定义的一个 op,类似于自定义的 Tensorflow 网络层. 可以看一下 Makefile 的内容,及定义的 cpp 源码. 如:REGISTER_KERNEL_BUILDER(Name("HighDimFilter").Device(DEVICE_CPU), HighDimFilterOp);
嗯嗯,谢谢。下午我实在没办法把这个文件夹放到同学的电脑上make了一遍得到了high_dim_filter.so这个文件。但是我把这个文件夹又复制到自己的服务器上运行un_demo.py时又遇到了这样的错误:
undefined symbol: _ZTIN10tensorflow8OpKernelE
请问您遇到了这样的错误吗?
具体的呢?运行时没有遇到错误.
方便留一下QQ吗?感觉这个评论没法输入图片或代码……
2258922522