题目: Context Aggregation by Dilated Convolutions - ICLR2016
作者: Fisher Yu, Vladlen Koltun
团队: Princeton University, Intel Labs
Dilated Convolution
Dilated Convolution for Semantic Image Segmentation
1. Multi-scale Context Aggregation by Dilated Convolutions
语义分割属于 dense prediction 问题, 不同于图像分类问题.
Dilated Convolutions 能够整合多尺度内容信息,且不损失分辨率,支持接受野的指数增长.
图像分类任务通过连续的 Pooling 和 Subsampling 层整合多尺度的内容信息,降低图像分别率,以得到全局预测输出.
Dense Prediction 需要结合多尺度内容推理(multi-scale contextual reasoning)与 full-resolution 输出.
处理 multi-scale reasoning 与 full-resolution dense prediction 冲突的方法:
- 利用重复的 up-convolutions 操作,重构丢失的分辨率,保留downsampled 层的全局信息.
- 利用图像不同 rescaled 的信息作为网络输入,并结合其输出. 不过无法确定哪个 rescaled 输入图像是最需要的.
Dilated Convolutions 不会降低图像分辨率,或分析 rescaled 图像,整合了多尺度的内容信息. 可以以任何分辨率加入到已有的网络结构中.
1.1. Dilated Convolution
定义离散函数:${ F: Z^2 \rightarrow R }$, 假设 ${ \Omega _r = [-r, r]^2 \bigcap Z^2 }$,${ k: \Omega \rightarrow R }$ 是大小为 ${ (2r+1)^2 }$ 的离散 filter. 则离散卷积操作 ${ * }$ 的定义为:
${ (F*k)(\mathbf{p}) = \sum_{\mathbf{s} + \mathbf{t}= \mathbf{p}} F(\mathbf{s}) k(\mathbf{t}) }$ .
其一般化形式为:
${ (F*_lk)(\mathbf{p}) = \sum_{\mathbf{s} + l\mathbf{t}= \mathbf{p}} F(\mathbf{s}) k(\mathbf{t}) }$
其中 ${ l }$ 为 dilation 因子,$*_l$ 为 dilation convolution. 当 ${ l=1 }$ 时,即为普通的离散卷积操作 ${ * }$.
基于 Dilation Convolution 的网络支持接受野的指数增长,不丢失分辨率信息.
记 ${ F_0, F_1, ..., F_{n-1} : Z^2 \rightarrow R }$ 为离散函数, ${ k_0, k_1, ... ,k_{n-2} : \Omega \rightarrow R }$ 是离散的 3×3 fliters, 采用指数增长 dilation 的 filters后,
${ F_{i+1} = F_i *_{2^i} k_i, \space for \space i = 0, 1, ..., n-2 }$
定义 ${ F_{i+1} }$ 中的元素 ${ \mathbf{p} }$ 的接受野为:${ F_0 }$ 中可以改变 ${ F_{i+1}(\mathbf{p}) }$ 值的元素集. ${ F_{i+1} }$ 中 ${ \mathbf{p} }$ 的接受野的大小即为这些元素集的数目.
显而易见,${ F_{i+1} }$ 中各元素的接受野大小为 ${ (2^{i+2}- 1) × (2^{i+2}- 1) }$. 接受野是指数增长大小的平方.
如图 Figure1.
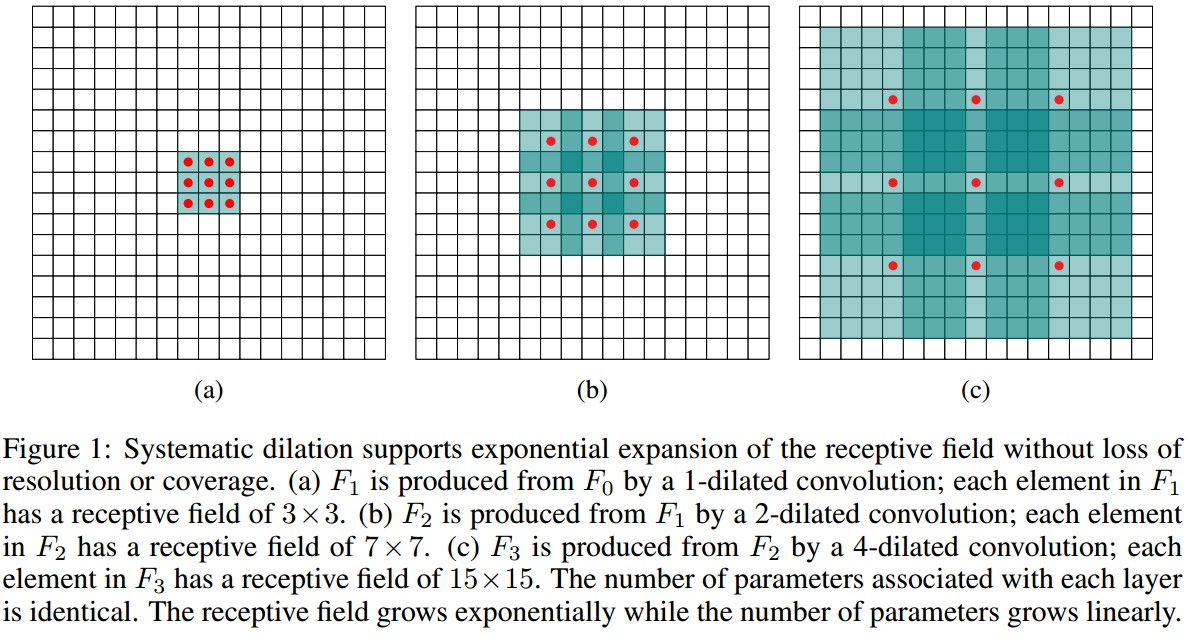
Figure1:Dilated Convolution例示.
(a) 采用 1-dilated convolution 对 ${ F_0 }$ 操作得到的 ${ F_1 }$,${ F_1 }$ 中各元素的接受野为 3×3.
(b) 采用 2-dilated convolution 对 ${ F_1 }$ 操作得到的 ${ F_2 }$,${ F_2 }$ 中各元素的接受野为 7×7.
(c) 采用 4-dilated convolution 对 ${ F_2 }$ 操作得到的 ${ F_3 }$,${ F_3 }$ 中各元素的接受野为 15×15.
各层的参数数量是相同的. 随着参数的线性增加,接受野指数增长.
1.2. 多尺度内容信息聚合(Multi-scale Context Aggreation)
context 模块通过整合多尺度内容信息来提高 dense prediction 的结果. 其输入是 C 个特征图(feature maps), 输出也是 C 个特征图,输入输出的形式相同.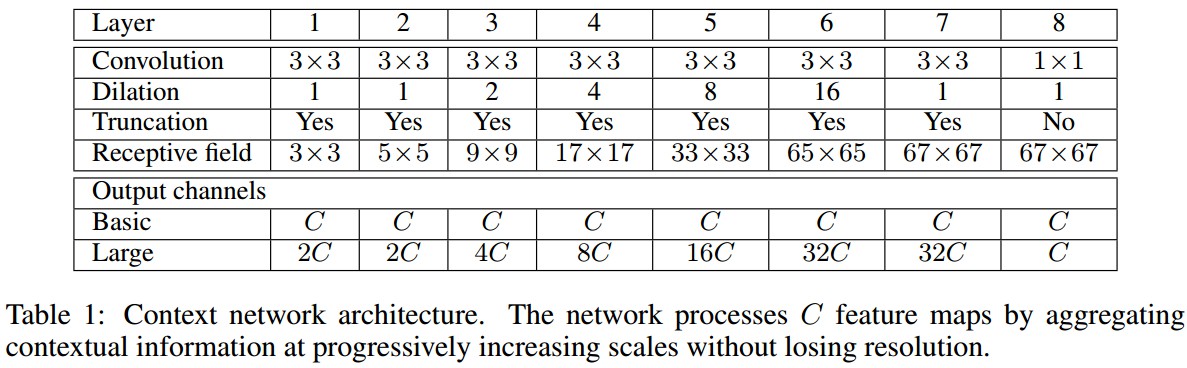
context 模块的基本形式中,各层具有 C 个 channels. 尽管特征图没有归一化,模块内也没有定义loss,但各层的表示是相同的,可以直接用于获得 dense per-class prediction. 直观上是可以增加特征图的准确度的.
基本的 context 模块有 7 层,各层采用具有不同的 dilation 因子的 3×3 卷积. 各卷积操作后跟着一个逐元素截断(pointwise truncation)操作:${ max(\cdot, 0) }$. 最终的输出是采用 1×1×C 的卷积操作得到的.
2. Caffe - Dilated Convolution
Dilated Convolution 已经可在 Caffe 官方的卷积层参数中定义.
    message ConvolutionParameter {
      // Factor used to dilate the kernel, (implicitly) zero-filling the resulting holes.
      // (Kernel dilation is sometimes referred to by its use in the
      //  algorithme à trous from Holschneider et al. 1987.)
      repeated uint32 dilation = 18; // The dilation; defaults to 1
    }
layer {
name: "ct_conv1_1"
type: "Convolution"
bottom: "fc-final"
top: "ct_conv1_1"
param {
lr_mult: 1
decay_mult: 1
}
param {
lr_mult: 2
decay_mult: 1
}
convolution_param {
num_output: 42
pad: 33
kernel_size: 3
}
}
layer {
name: "ct_relu1_1"
type: "ReLU"
bottom: "ct_conv1_1"
top: "ct_conv1_1"
}
layer {
name: "ct_conv1_2"
type: "Convolution"
bottom: "ct_conv1_1"
top: "ct_conv1_2"
param {
lr_mult: 1
decay_mult: 1
}
param {
lr_mult: 2
decay_mult: 1
}
convolution_param {
num_output: 42
pad: 0
kernel_size: 3
}
}
layer {
name: "ct_relu1_2"
type: "ReLU"
bottom: "ct_conv1_2"
top: "ct_conv1_2"
}
layer {
name: "ct_conv2_1"
type: "Convolution"
bottom: "ct_conv1_2"
top: "ct_conv2_1"
convolution_param {
num_output: 84
kernel_size: 3
dilation: 2
}
}
layer {
name: "ct_relu2_1"
type: "ReLU"
bottom: "ct_conv2_1"
top: "ct_conv2_1"
}
layer {
name: "ct_conv3_1"
type: "Convolution"
bottom: "ct_conv2_1"
top: "ct_conv3_1"
convolution_param {
num_output: 168
kernel_size: 3
dilation: 4
}
}
layer {
name: "ct_relu3_1"
type: "ReLU"
bottom: "ct_conv3_1"
top: "ct_conv3_1"
}
layer {
name: "ct_conv4_1"
type: "Convolution"
bottom: "ct_conv3_1"
top: "ct_conv4_1"
convolution_param {
num_output: 336
kernel_size: 3
dilation: 8
}
}
layer {
name: "ct_relu4_1"
type: "ReLU"
bottom: "ct_conv4_1"
top: "ct_conv4_1"
}
layer {
name: "ct_conv5_1"
type: "Convolution"
bottom: "ct_conv4_1"
top: "ct_conv5_1"
convolution_param {
num_output: 672
kernel_size: 3
dilation: 16
}
}
layer {
name: "ct_relu5_1"
type: "ReLU"
bottom: "ct_conv5_1"
top: "ct_conv5_1"
}
layer {
name: "ct_fc1"
type: "Convolution"
bottom: "ct_conv5_1"
top: "ct_fc1"
convolution_param {
num_output: 672
kernel_size: 3
}
}
layer {
name: "ct_fc1_relu"
type: "ReLU"
bottom: "ct_fc1"
top: "ct_fc1"
}
layer {
name: "ct_final"
type: "Convolution"
bottom: "ct_fc1"
top: "ct_final"
convolution_param {
num_output: 21
kernel_size: 1
}
}3. Reference
[1] - caffe::ConvolutionLayer
[2] - Multi-scale context aggregation by dilated convolutions